|
|
Post by doulsy on Mar 2, 2017 12:37:36 GMT
if the frame came up as a ringer it will still flag up as stolen/written off or whatever even without you using the reg number, the frame number is on the system if the reg is, the two are linked.. dvla have no record of frame number, told me to restore it, get dating cert, MOT ect then re-apply, i have asked for dating cert from the link on this thread. |
|
|
|
Post by doulsy on Feb 25, 2017 21:35:37 GMT
Piaggio are still making scooters and are the same company that made the T5 classic, it says piaggio then prefix and serial on the plate, think thats why they are asking me for dating cert from them, the reg plate comes up on the dvla check when i put piaggio and the reg in but not when i put vespa in, frame came up as a ringer on a check i done, i never gave dvla the reg for this reason, and im having to register the frame as the numbers have never been on the dvla system. the same serial is also on the frame as well as the plate and it don't come up on scooterhelp either  |
|
|
|
Post by doulsy on Feb 21, 2017 21:07:40 GMT
thought it was just a matter of getting one from VCB but been reading about dvla rejecting some and instead insisting on one from piaggio, just reading about dvla changing some rules regarding dating certificates, after a phone call to them last week i was told to contact manufacturer for dating certificate then get mot. anyone did this recently?
|
|
|
|
Post by doulsy on Feb 17, 2017 20:57:40 GMT
scooter is looking great, gonna be a belter, anyone know where to get decent quality gear cable adjusters? mine needs some adjustment but the sh*t quality nut snapped and i will most likely need to change cable also.
|
|
|
|
Post by doulsy on Feb 6, 2017 23:00:38 GMT
never knew you could buy leds equivelents, crazy as i have them in my camper, i have never had any problems with bulbs but led is defo the way ahead.
|
|
|
|
Post by doulsy on Feb 5, 2017 15:47:19 GMT
i think so, i have a frame thats twisted, it was a friend of mine who noticed, i have been in contact with some one can fix it with a vespa jig, he said it takes about one hour, i tried to line up a welding rod the same as your drawing and it was off centre. i then tried it on a friends frame and his was bang on.
|
|
|
|
Post by doulsy on Feb 4, 2017 21:54:52 GMT
1st Feb, Doulsy said: "not a clue how to check coils or pick ups".......so; you found this out, or ignored the point? Maybe you’ll get some more soldering practice before you’re finished……... ignored it m8, not a first, did a google search and it never understood the stuff i found so yes. i have ignored this part oh and thanks for the help |
|
|
|
Post by doulsy on Feb 4, 2017 21:41:57 GMT
1st Feb, Doulsy said: "not a clue how to check coils or pick ups".......so; you found this out, or ignored the point? Maybe you’ll get some more soldering practice before you’re finished……... ignored it m8, not a first, did a google search and it never understood the stuff i found so yes. i have ignored this part |
|
|
|
Post by doulsy on Feb 4, 2017 20:40:09 GMT
my solderings skills are not very good, this is the best i could do, will i need to cover the soldered bits with something? 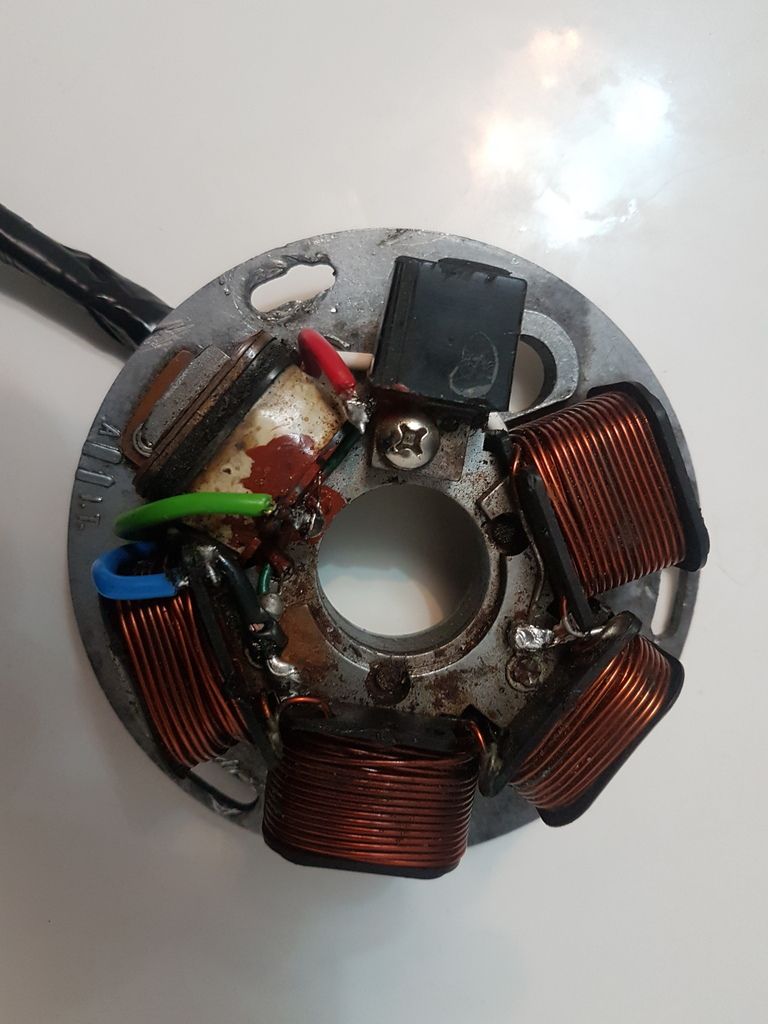 |
|
|
|
Post by doulsy on Feb 4, 2017 13:57:19 GMT
my five wires arrived today, cant find my little gas soldering iron any where, hoping to give it a try later, what is the brown stuff that covers the solder connections?
|
|
|
|
Post by doulsy on Feb 4, 2017 13:40:04 GMT
remember that thread now, i rebuilt my engine last year and its running fine and i pretty much standard. put a sito exhaust on it and upped the jet, i dont really want to start messing with it to see how base gasket thing works but some of the lads on that thread know their stuff.
|
|
|
|
Post by doulsy on Feb 3, 2017 19:43:14 GMT
Hi!, I read on here that adding up to 4 base gaskets (5 total) to the casing /barrel would help improve performance a little. I cant understand why as I would have thought compression pressure would be lost. Any answers would be great! Cheers read something on here about it, i might be wrong but is it not for longer stroke cranks? |
|
|
|
Post by doulsy on Feb 3, 2017 19:32:42 GMT
I've just pulled a new beedspeed loom on my Sportique and it proved to be a right ballache, it only just about reaches everywhere, there's no slack left. I had to take the headset off to get better access, then all the cable outers had cracked with age and split. Clutch, gear, throttle, front brake and speedo all split Had to pull all new cables through the frame as well as the loom Rear conduit that holds the rear cables in was so tight, it took about 20 goes with some old 1mm twin and earth stripped back feeding backwards and forwards I think it's taken about 4 hours so far and nothings connected away yet, beedys sent the wrong speedo cable so I'm waiting on that I've skinned all my knuckles in the process good luck  it was fun though |
|
|
|
Post by doulsy on Feb 2, 2017 20:14:40 GMT
good luck, its some buzz when you get it running again.
|
|
|
|
Post by doulsy on Feb 1, 2017 20:08:36 GMT
I’ve rewired lots of used stators now; it’s a pretty straightforward job; this one shown is a T5 stator, but it’s almost the same (just the black – loom ground – wire connects differently, but doesn’t have to) – my coloured blobs on stripped-stator photo show where to connect wires, part-copy of my schematic show where they go on the loom/scooter: 
Forget ALL old wiring; use a soldering iron to strip it.
Test HT and pickup coils directly on stator; replace them if not up to scratch
Identify which coil the new wiring needs to be resoldered to, and route wiring with reference to how it routes around coils, through and under stator body, and through tube in frame – get it right before soldering.
Resolder, test with multimeter, and shroud wires.
Crimp spades, solder and heat-shrink to red, white and green wires going to stator – they get pulled-about, so I crimp and solder them.
Leave bare, or fit plastic connector**, or fit spades to blue and black wires to loom.
It’s ready to fit, pass through frame, and connect to CDI and loom.
Rotate stator body to approximate timing with marks on stator and casings, but make sure you strobe later too (mark timing on casings for this).
**On an old set of (125/150) casings the tube is narrower, and the plastic connector block will not pass through it.
**With that in mind, and noting what pxguru said about those connectors burning out, it’s probably better to fit spades to black and blue; up till now I’ve tried to reuse or replace the plastic blocks, but maybe I won’t do that any more.
I did buy a repair kit for the first one I did, but I can’t find those any more, and it’s just as easy to just get the bits you need anyway:

A meter of each colour will do for two stators; there’s loads on Ebay, so are the LT and pickup coils if you need them – keep the copper plate and bracket off the old LT coil though; you’ll need to find a rivet too.
Scooterhelp says 16 – 18 gauge; 16gauge=1.5mm²=21A, 18gauge=1mm²=14A.
For a 120w stator @ 12v, it’s 10Amps (Ohm’s Law), but erring on the side of double-it-and-add-a-bit, (I think I used 16Amp multi but can’t find any quickly anyway), there’s 16gauge single-core multi-strand, 1.5mm², 21A (=252W) in all the colours you need, at .99p/metre here:
www.ebay.co.uk/itm/14A-21A-30A-12v-Automotive-Cable-1m-100m-Auto-Wiring-Loom-Marine-1-1-5-2-5mm-Amp-/251737702046?var=&hash=item3a9cbc7e9e:m:mAOOLDMgwCK3MGr9UXd5ykg
In fact I’ve just ordered myself some more………………
Any other questions; you should know to read old threads – I know I’ve posted all this a few times before.
thanks sime, yes your threads allways come up on google when im searching for stuff but sometimes they have to much info to take in not a clue how to check coils or pick ups and i dont have a clue how to use a strope, i will tackle the rewiring though and bump this thread about timing when the time comes. |
|
|
|
Post by doulsy on Feb 1, 2017 19:11:54 GMT
Going for simplest option first; the pedals themselves to tend to stick down, which keeps the brake light on - the pedal itself might just need a spray and a wiggle to get it returning properly. If that doesn't work, drop it using the method above and have a look at the switch; it's just two wires and a couple of quid - easy job. yeah un-bolt it and check it out, might just need wd40 but if you need a switch im sure i have 2 spare. |
|
|
|
Post by doulsy on Jan 31, 2017 21:41:02 GMT
can anyone point me in the right direction regarding stator wiring? amps ect, thought i could by a kit you could solder on but my google searches have been fruitless.
|
|
|
|
Post by doulsy on Jan 31, 2017 21:06:28 GMT
Evening all, I have just got myself a 2006 PX125 (200cc engine fitted) I have a couple of questions..... It would appear the brake light is stuck on, I have removed headset and located brass front brake light switch, removed both wires and they are both live so I am guessing rear brake light switch is faulty and current is coming back up the wires. Any idea where the rear switch is located and how to change? Also this has no electric start however it does have electric start button, would it have come standard with electric start and its just been removed along with the battery? Its been modified with GS panels, horn cast and front mudguard with all indicators removed and flushed so maybe I will come across a few other little problems as I dig deeper. Thanks in advace for any help or advice. the brake switch is at the pedal, you will need to remove brake pedal as its attached, don't buy one i have one somewhere you can have for free, its from and older scooter but i think they will be the same, will look it out if i get the time. |
|
|
|
Post by doulsy on Jan 30, 2017 21:35:33 GMT
yes 3 wires to cdi along with the green kill switch
|
|
|
|
Post by doulsy on Jan 30, 2017 21:33:18 GMT
my tx is a p2 engine non battery 3 wire one to back 2 forward to loom its very possible its an upgraded stator or built with it in for the choice at factory or pre sale for upgrades when you choose options from new that way it would only need dc option rectifier to power a battery. beedspeed do the dc loom but it has startor on so a waste of money realy you only need the rectifier and to split one wire off into two at rectifier to feed the dc side you have blue and black going into loom and a few to cdi im sure. my p2 lay in a garden for 30 year so its not had upgrade, even using the original cdi |
|
|
|
Post by doulsy on Jan 30, 2017 21:27:26 GMT
i used dirko round my cases along with the gasket as i kinda damaged my cases when splitting engine, a mechanic friend recommended this stuff dirko link btw you will get it cheaper than this i have only ever done one engine rebuild, i also used loctite and torqued everything to proper settings, my engine has done 700 mile break in miles since but no leaks so far, well one part of case was a bit wet with oil the first few days but it went away or i was just mistaken. |
|
|
|
Post by doulsy on Jan 30, 2017 21:16:05 GMT
Many thanks for the replies and some great tips i have taken tank out i just need to remove the panel levers so i can remove the cover. being a tight git i bought a replacement off ebay and it is sh*te so i am now waiting for a proper one.i shall keep you informed once harness arrives in the next week or so cheers mart my loom was only £32 from beedspeed and they were very help full with a problem i had, they gave me a diagram but never mentioned they had adapted the loom to save me connecting a loop for my hi beam and indicator warning lights. |
|
|
|
Post by doulsy on Jan 30, 2017 21:02:01 GMT
3 wires non battery 5 battery  just taken tx stator off and its 3 non battery one im putting in is a disk battery model stator and its 5. so you will have a choice later to convert to battery very easy if you want for dc horn or spots usb charger and so on pretty sure my p200e non battery has a 5 wire stator, would need to look back at photo's though, found this guide . linkcant find a kit, guess i will need to buy wiring. |
|
|
|
Post by doulsy on Jan 29, 2017 21:15:03 GMT
maybe the plug only has 2 wires, i only had a quick look and not really planned ahead till i have log book.
|
|
|
|
Post by doulsy on Jan 29, 2017 21:02:04 GMT
pxguru? is that allready on the it mark? or should it be on the I before the T, look at this wirirng its a 5 wire and i cant even tell the colours lol, the t5 has a round plug with 3 wires on it, should 3 not go to the cdi or does one go back from the plug? 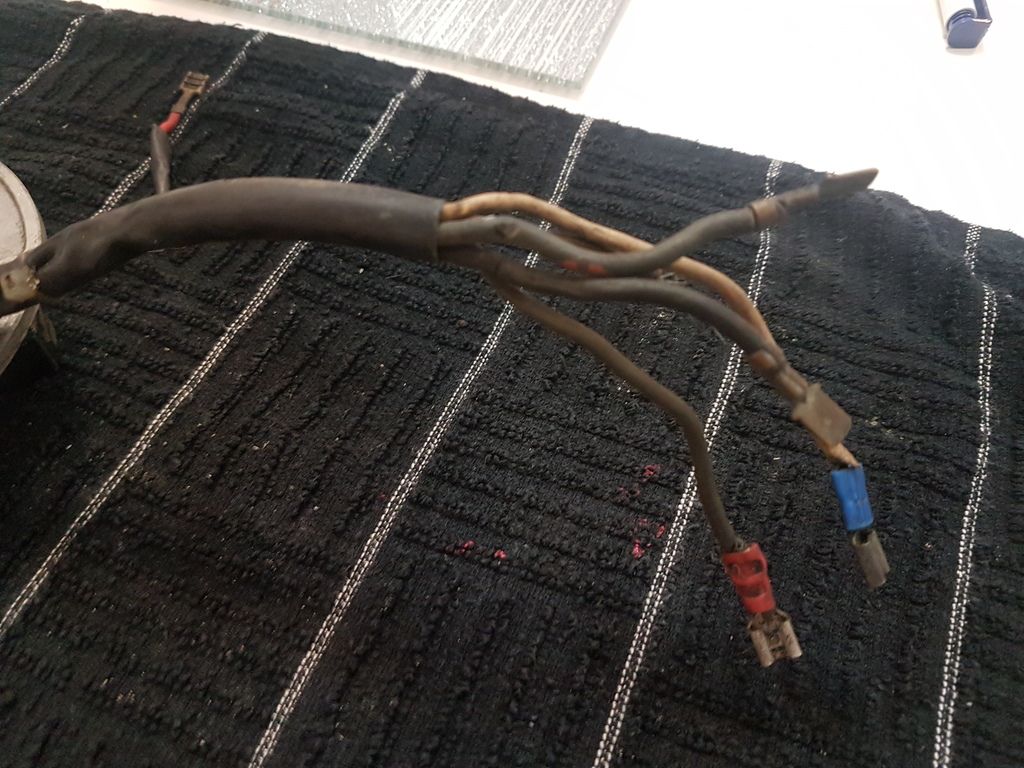 |
|
|
|
Post by doulsy on Jan 29, 2017 11:37:09 GMT
my prefix has piaggio stamp then vnx5t then a star, under that it has a star with 6 numbers then another star, of the 6 numbers the first 4 are bunched together then a space then 2 numbers together 18 |
|
|
|
Post by doulsy on Jan 25, 2017 22:07:52 GMT
spitting out the carb? im told blow back is pretty normal, had it myself with my standard p200e, runs ok, had lots of issues with my carb, run it with a spaco carb now, pretty sure i started a thread about it on here before.
|
|
|
|
Post by doulsy on Jan 24, 2017 20:54:40 GMT
For a 125 that is reasonably standard the timing should be exactly on the 'IT' mark. The stators are the same on both. Crumbling wires tell me that it is an older stator though. Nothing wrong with that just old fashioned wire. Solder on some new ones and it should be fine. Be sure the wire used is a multi stranded core, as it will break less easily. thanks |
|
|
|
Post by doulsy on Jan 24, 2017 20:50:44 GMT
a couple of months ago all my lights and indicators and speedo decided to pack up see recent threads,well after farting about with it and getting somebody to look at it. i have now decided to fit a new main loom does anyone have any tips on fitting this loom my scooter is a px 125 2006yr many thanks Mart take tons of pictures when removing the old one, you will get a diagram no problem but the pictures will help, think i cut away most of the loom so it only left the main bit going through the frame, then taped the new one to it and pulled it through, my scooter was a bare frame at the time though. |
|
|
|
Post by doulsy on Jan 22, 2017 21:14:44 GMT
drill it out, i have done this on older vespa's, pretty easy but there is two sizes of locks, 6mm and 8mm on older scooters so bare this in mind. i never had to remove handle bars but mine was a 78, maybe older scooters you might need to but i have never done it on a pre p range
|
|


 just taken tx stator off and its 3 non battery one im putting in is a disk battery model stator and its 5. so you will have a choice later to convert to battery very easy if you want for dc horn or spots usb charger and so on