|
|
Post by vespasco on May 17, 2015 18:38:26 GMT
Me too H! I was reading, then started getting mixed up between, inlet on case, inlet on crank timing, inlet on piston and cylinder, rotary valve, disc valve,,etc I guess what i was getting at, would having inlet timing at 118/65 for eg, be beneficial in curing the 4stroke stutters? (As this maybe possible for me to do) Im wondering if my crank/inlet timings (107/74) are not so good for my set up and causing blow back. I know they're not great but im looking at ways to improve that  Hopefully, the cheapest and the best way!!  I could get the inlet welded/built up for the price of a drink, probqbly, and totally re work it to give earlier opening/closing. Theses cases already have a few repairs so i dont mind working on them some more. Im quietly confident there wont be too much heat/distortion and that i could finish by hand. Anyone done this? How far can i go on my inlet opening? Thats what im trying to figure out.. |
|
|
|
Post by henri on May 17, 2015 20:09:37 GMT
was still thinkin on this 1 , as i was messing up my reed valve spacer plate in the shed , for the hassle of weldin n re-cutting a inlet , ive a foot square of 20mm ali plate ,ive lost 4" square from 1 corner by cross eyed markin an a tap snappin in a hole , but can send ya enuff to cut n drill an fit a lml reed valve ,bout 8 quid on evil bay , if worried bout height/clearances the reed block can be shaved down by bout 5-6mm , i'm copying the idea from a guy who had a damaged sealing pad on his large frame an the carb box still fitted without rubbing ,just, tho with a rally frame n px lump its already tight so not 100% sure it will work, will post sum piccys tommorrow so ya can see what i mean ,
but reed = no blow back ,no stutter an it opens up a whole world of inlet timing/crank choices , intriguing, eh, H
|
|
|
|
Post by vespasco on May 18, 2015 0:03:22 GMT
Thanks H but thats not really an option on the Rally chassis. Its the same with a decent carb...its too tight on the chassis...thats one reason why ive ever looked into bigger carbs too much. The Rally comes with the p200 lump as standard  and youre right, theres not much clearance,even with the stock carb!!! |
|
|
|
Post by pxguru on May 18, 2015 9:43:16 GMT
I am doing the same with my tourer. Keeping the SI carb as its all thats needed. The SI carb will set up ok but like you say that inlet timing is not ideal.
Your inlet timing has two issues. Its too short on the BTDC side and too long ATDC. The blow back is caused by the long ATDC timing. The long duration here makes more power at high rpm but makes it blowback more at low rpm. The short duration BTDC is just losing power (but more economical).
As long as you can get a chocolate plug at WOT with a 140 air corrector and a 160 main jet the SI carb will be ok. If you can't get this you're going to need to do the un-thinkable and down tune it!
|
|
|
|
Post by pxguru on May 18, 2015 9:43:36 GMT
To correct the inlet timing the metal needs to be put back on the crank for the ATDC bit and off the casings for the BTDC bit. Any more than about 185 degrees of total inlet duration and it will not be a touring set up anymore and will need a different barrel kit with bigger transfers to let the mixture out the crankcase.
|
|
|
|
Post by vespasco on May 18, 2015 11:34:04 GMT
Ok. Thats what i was thinking... That it would need inlet/ transfers opened more to let the extra fuel from the longer duration inlet. And/or sorting the inlet duration ! So im heading in the right direction at least! My transfers have quite a long duration already! (127.5°) I havent measured accurately but there looks like there is plenty of room to weld the case inlet and still get decent timing  i can take the inlet opening back to 140° if need be and weld the closing ° to around 55° if need be! I could have what timings i like then  ! |
|
|
|
Post by pxguru on May 18, 2015 17:22:06 GMT
If you touch the casing inlet with a welding torch the main casing will be a write off. I just cannot see this going well.
if you just change the crank for a shorter ATDC duration it will be cheaper in the long run.
Your transfer ports are 127.5 degrees but they are only 2 ports. I am talking about any barrel with more ports. Like the ally polini barrel.
There is no real need to spend any money though. Sounds like it is going fine as it is. just get it jetted in better.
|
|
|
|
Post by vespasco on May 18, 2015 22:39:19 GMT
I thought there must have been a reason why i dont hear of people doing that! Is it just because of the distortion from the heat or?
Im a little reluctant to use liquid metal so ill knock that idea on the head and think about saving for a new crank... Some day... .or a Polini (which will be my next motor...some day)
First i have to find time to ride it and get it dialled in :0
|
|
|
|
Post by vespasco on Jun 5, 2015 20:22:10 GMT
The engine cases have been swapped. Im just waiting for a new rear shock before i can fit the motor back in. The shock ive been using was for cosa i think, which means the spacer bar in the bushing on the cases needed cutting down to 45mm. (Stock P range is 48mm) Its a cheap indian shock but was pretty firm and a good height I dont want to chop my 'new' cases/shock mount so i saved some pennies and bought a proper sized shock (Pinasco). Ill probably paint it black tho'. Im still waiting for it before i can fit the motor. I thought their e.t.a. was a little ambitious (yesterday)  Edit...i got busy. Update on the,motor. The 'new' cases have ben fitted with sip performance crank bearings, stock piaggio elsewhere. Viton seals too. BGM primary repair kit fitted. The yellow springs had to be drilled out with a 7mm drill bit so that the smaller springs could fit inside. 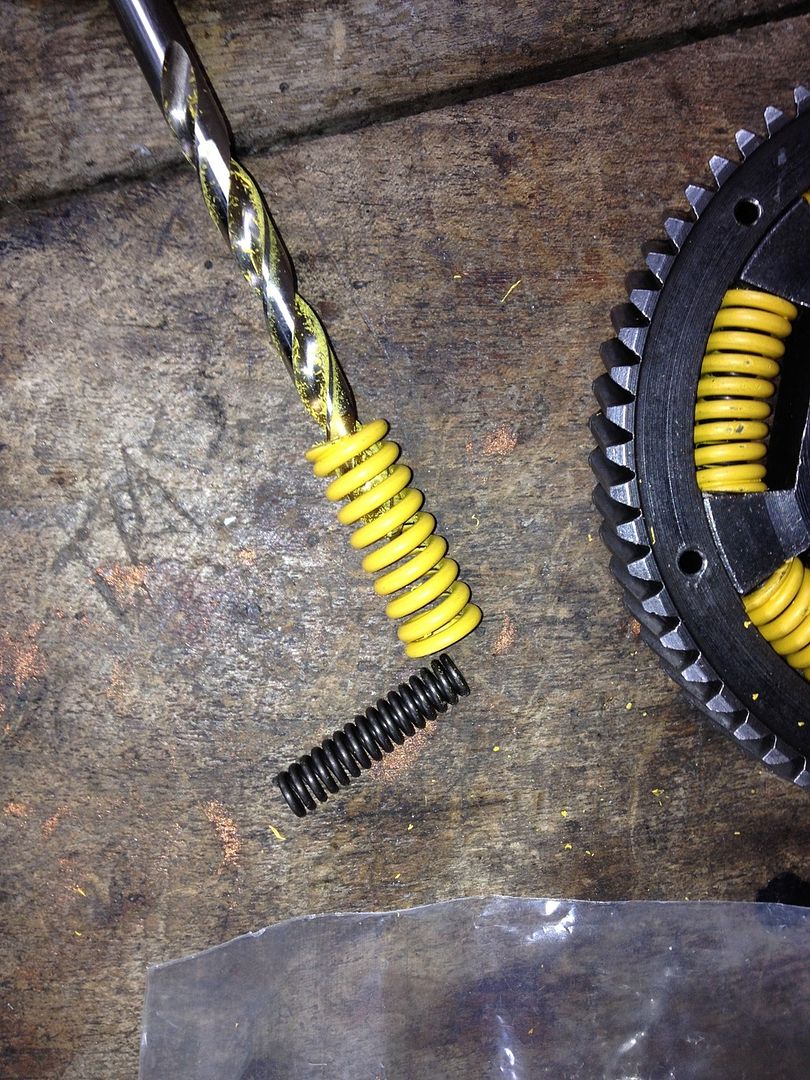 I fitted them like so....with mole grips and giving the spring ashort sharp blow with a blunt object. (My poor pliers)! 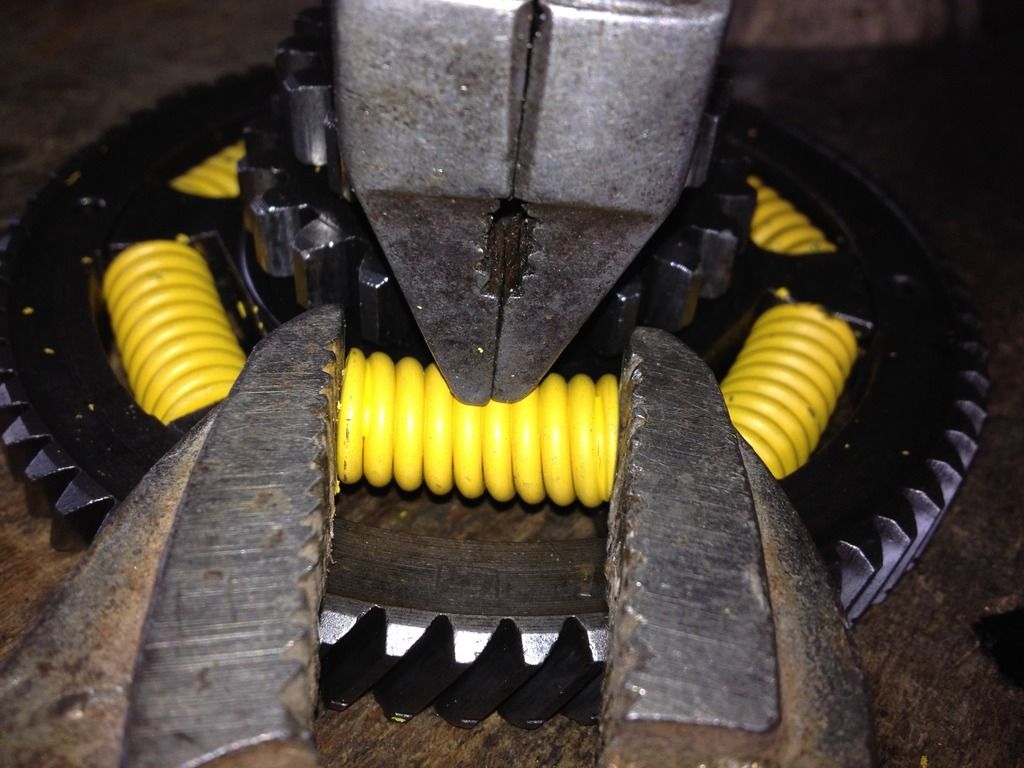 I've swapped heads too. Maybe i shouldnt have done. Time will tell. But it was one thing i was going to try anyway. Its slightly less compression and with a smaller squish band I also changed tyres. So glad i dont have tubless rims! I used my last 2 Conti Navigators, all season tyre. No signs of a puncture and no signs of goop but i did have good quality tubes in there. I even started to clean the Vespa! (Well, the engine compartment anyway)! I was thinking of using a bit of wire wool on the rest to speed up the patina im slowly trying to achieve. It gives me a good excuse to go ride it and get it dirty again! I was going to re-foam the seat too! I may still have time to do that. |
|
|
|
Post by vespasco on Jun 7, 2015 18:13:48 GMT
I wish id check my 'stock' of parts i didnt know i have a little more often. The motor is plumbed in ready to go minus a shock absorber. Then i thought id check the treasure trove in case there was an old one knocking around. Wel! Blow me down if there wasn't a brand new one in a box!!! So i soon fitted that and off into the sunset!!! The Vespa is back! I started with 160 BE3 138 and 52/140 idle Idle wasnt quite right so i tried a stock 55/160 Yes!! No stuttering around 4000rpm so i upped the main to 140. Still smooth all through the rev range  so upped again to 145 and its just on the edge of smooth/stuttering, telling me 142 should be good, 145 v v slightly rich. But ive yet to WOT it as yet. There is improvement! Before, in 4th gear, the rpm matched the speed - 4000rpm = 40mph, 5000 = 50mph etc etc. Now in 4th the speedo /rev counter reads @ 4000rpm and speed is bouncing between 42/43mph, 5000rpm = 52/53mph !!  I havent taken it passed 1/2 throttle yet but still managed to cruise at 64mph for a little bit. Although on main roads, i are mostly be riding @ 1/3rd throttle. Around town is also smooth in 4th below and above 30mph with just the occassional hiccup, likely caused by the main being slightly too large, as with the 138 mj everything was v smooth. Before i could only go up to a 135mj before it started stuttering badly at low revs (around 4000rpm) So somethings definitely improved somewhere, along with having more power its good news!! So far anyway, ive not opened it up yet. I tend to do 100/200 miles after a full rebuild, give the seals time to settle and also check/listen for weird noises. Ill do a dyno soon, after i know its still ok at WOT. Im expecting more power / torque all round!!? I might even get an out n about piccy too!! |
|
|
|
Post by sime66 on Jun 8, 2015 7:53:54 GMT
Good job!
Do you think you had a case leak you couldn’t find then?
Looking forward to some dyno stuff when run in and WOTting again – don’t forget the new tyre size for the rpm/speed….
Then it’ll be a big PHBH carb no doubt, - I’ve read a couple of times that Si carbs get tricky over 140mj; have you found that?
(Nice pics of the cush drive too; I’m coming up to that job soon…..)
|
|
|
|
Post by vespasco on Jun 8, 2015 17:43:27 GMT
Those cases were pretty bad. Who knows. I kinda suspected a hair line crack somewhere but couldnt pin anything down for sure. I may use those old cases for a stock motor. I think i have enough spares! I think theres still a few more 'un-tuned' miles in them. The tyres are the same make/model but yes a slightly thicker/new tyre may have given slightly higher speeds, (although i never changed the front tyre/speedo). Im still not convinced the Phbh will fit with enough tolerance on the chassis/panel...but im sure ill try a mock up if i get the oppurtunity (although i dont want the oppurtunity, i want it dialled in and not have to touch it again). I'll run it in in a day...but that wont be soon  Work, parties and hangovers will be stopping me |
|
|
|
Post by sime66 on Jun 8, 2015 19:43:47 GMT
I was forgetting about the lack of room on the rally for the carb.
I mentioned the tyre because the gears/revs/speed will be the same; in this case the increased speed at same revs would be because the rear drive tyre is bigger - if we know how much bigger we can see if it explains the increased speed for the revs - just a thought...........
Parties and hangovers - haven't had a hangover for five years!
|
|
|
|
Post by vespasco on Jun 9, 2015 21:46:03 GMT
Yeh good thought! But for continuity on the speedo readings im not going to start tweaking the sip speedo settings. I managed to get a quick 30 mile trip in after work and im confident there is definitely more power. Along with the fact i can jet to 145 without problem (before only 135 max before it started stuttering) tells me something too. Also, today i managed a quick burst of 3/4 throttle and took it briefly to 74mph with a tiny bit more to spare. It feels like its former self, the Vespa ive been used to, riding in 4th everywhere from 30mph+, rarely having to change gear to accelerate  * edit - but with some bigger balls  BUT That ^^^ was with a tank more than 1/2 full! No problems Then as the fuel level/pressure dropped it starved of fuel anything over 1/2 throttle. Id been through this fuel tap/fuel starving before. Im now happy its not my carb/settings Its the supply from the tank when there is more air than there is petrol. I thought, when i opened it up and it starved fuel, that i was about to switch to reserve but the fuel level hadnt reached reserve....the tank was 1/2 empty/full, depending on how you look at life. Do i need to drill out my tank cap breather hole some more? Would that help? I have noticed, now i have a p range to look at, that the top of the tanks are a lot higher than pre P range models...which i imagine would mean that the bottom of the tank would also be higher than my Rally? Giving better flow? I roughly measured the difference between the tap outlet and the carb inlet on my Rally once and it was only something like 30mm maybe 40mm..ive got it written down somewhere but i was suprised by just how little it was. Its annoying not being able to ride it fast with anything less than 1/2 tank of fuel! Any other things could i try? Id really rather not have a fuel pump btw but i could be convinced if it means i can keep the si carb * good on ya btw  |
|
|
|
Post by vespasco on Jun 9, 2015 23:08:54 GMT
I thought id post how i fit the inner race of the flywheel bearing to the crank... I have a couple of 'other' tools that help considerably, a solid base to sit the crank in... 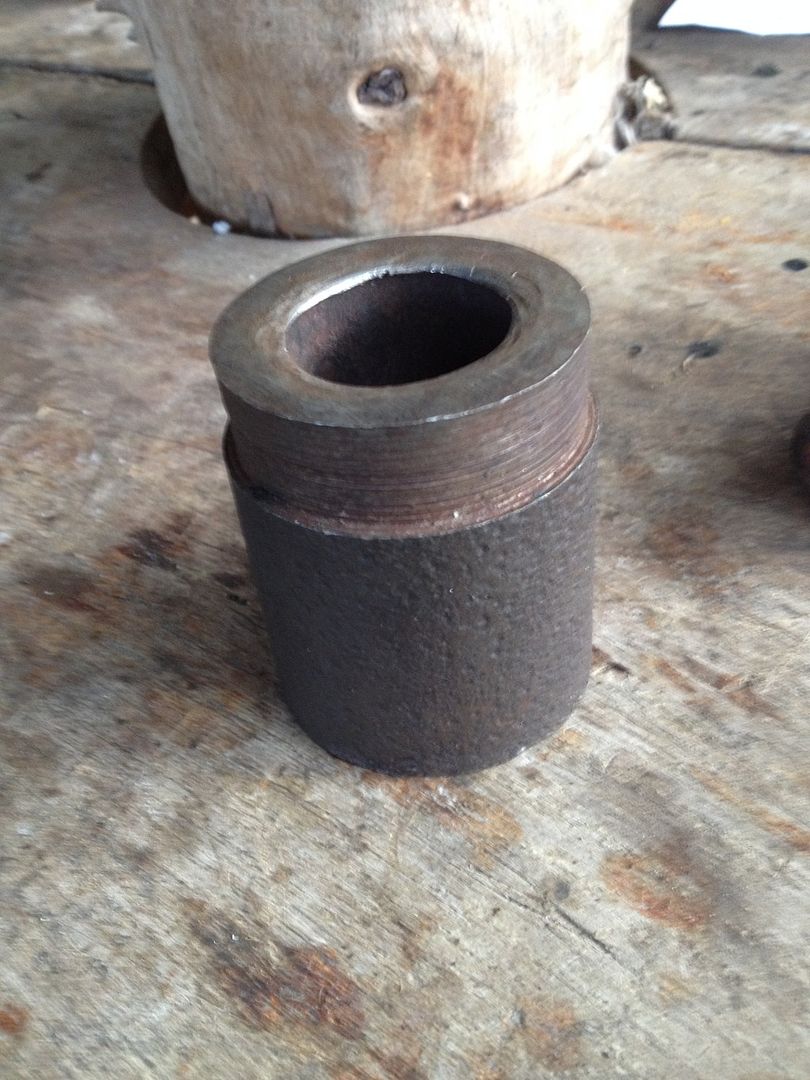 And a driveshaft/crankshaft pullers' pipe! 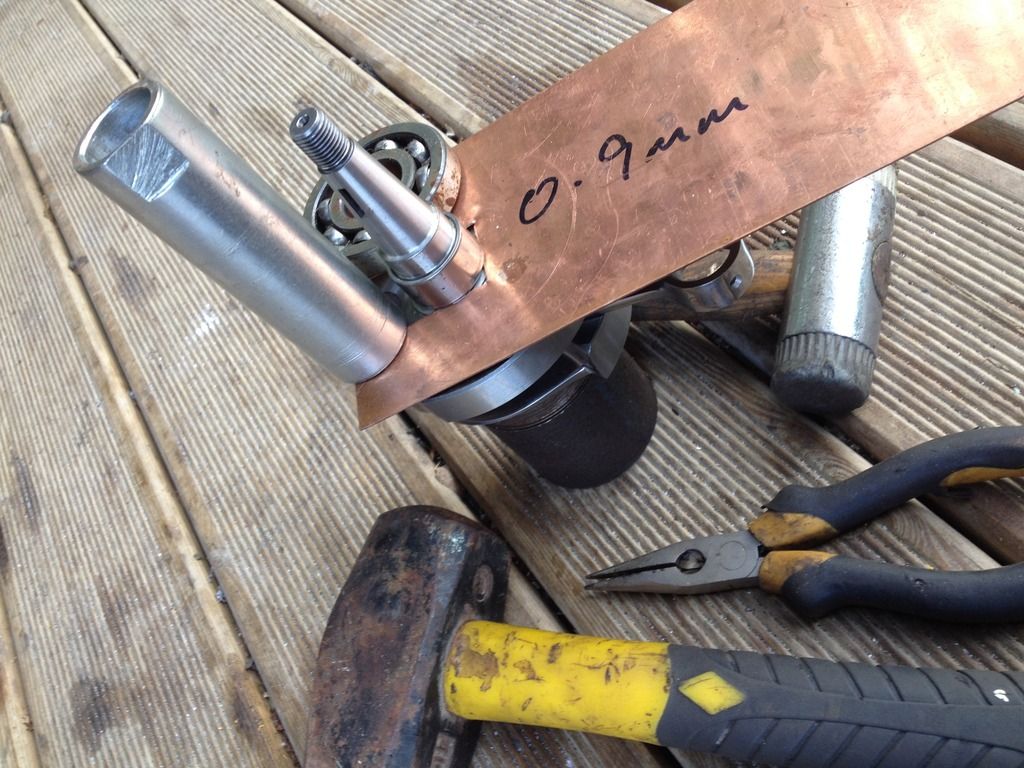 Along with some long nose pliers to take the inner race out of the hot oil 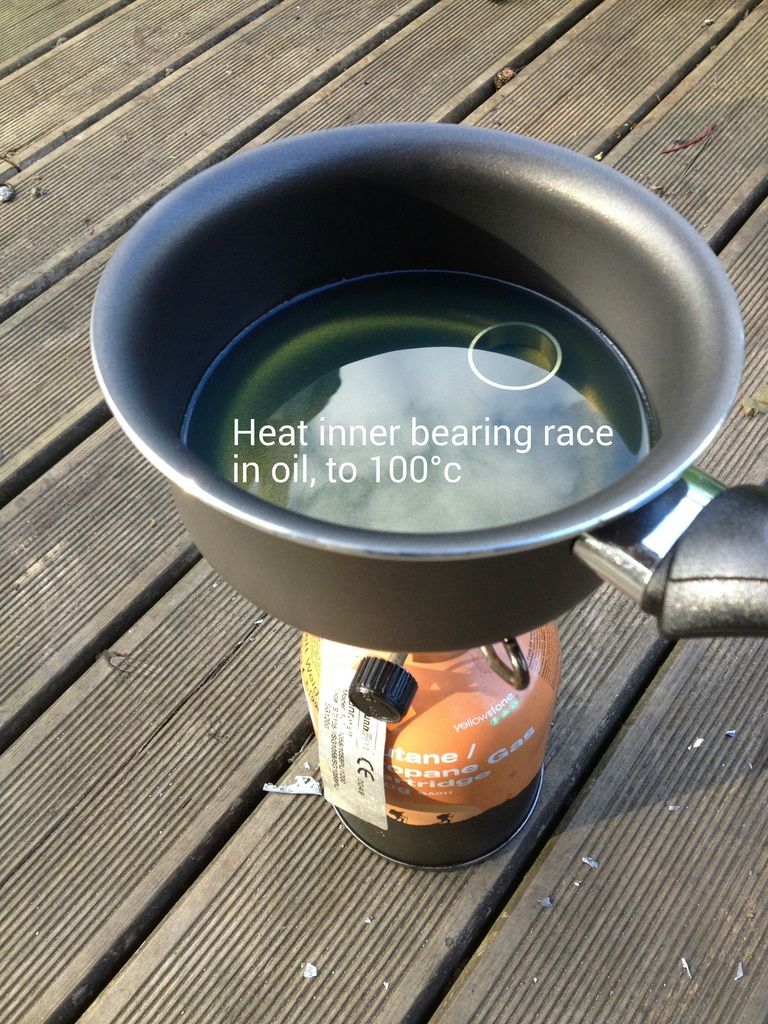 A heavy hammer, maybe the lump hammer pictured is a bit much but i didnt have my large ball peen hammer to hand. An old clutch bearing to pack the pipe, also used as a guide The 0.9mm sheet i have should be 1mm i suppose but gently nipped up it gives 16mm spot on and is easy to get out. (I also use a crank wedge) 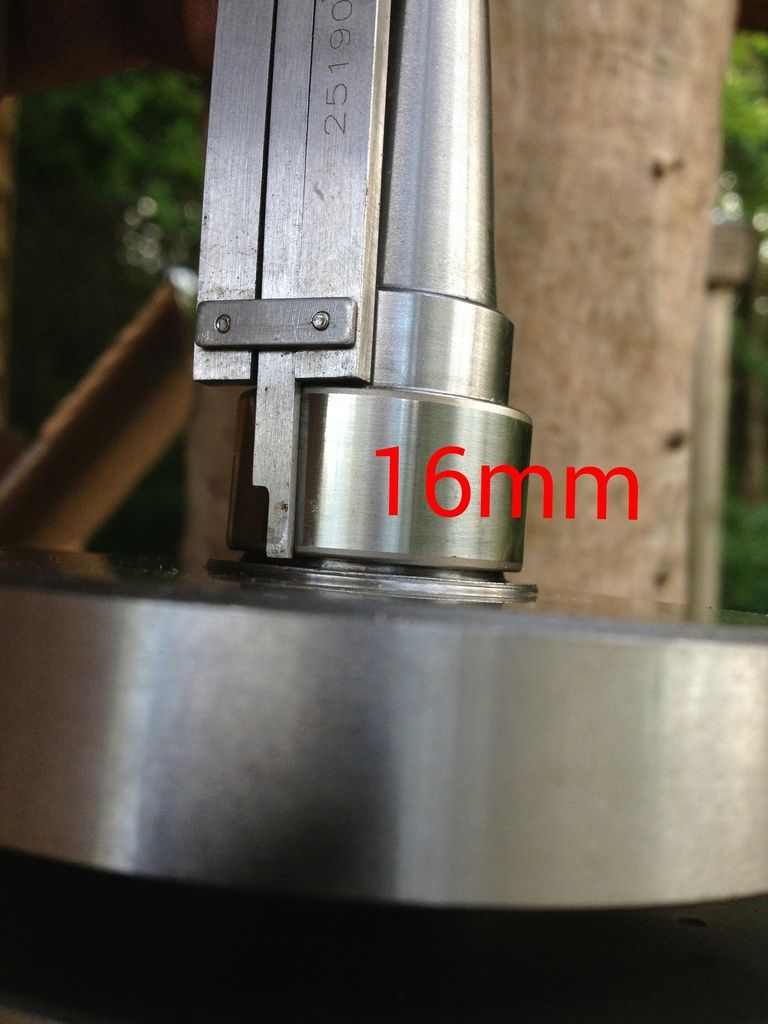 And talking of cranks.... Ive realised ive missed something off the list of latest mods. ! :0 and its quite important/changes things too! The crank is a new Pinasco 60mm !! Dont look at the price, as i didnt pay that much  Much better timings too!! The inlet is now 120/59. Id like to check that again but hopefully i wont get the opportunity as ill be riding it! But im happy its better and the torques are back  How much that is to do with the inlet timings im not sure. I realise the earlier opening/closing gives more power in the lower /mid range...but it could also be due to the new cases (a definate improvement) + a couple of mods. here and there...the 'porting' on the casing was similar but no doubt improved upon with the help of sime66s' Gearbox/porting thread on similar matters. If it is only/mainly due to the earlier inlet timings then i think its pretty sweet for what i want and for what it always used to be...a torky tora  and still looking stock. |
|
|
|
Post by vespasco on Jun 14, 2015 21:02:00 GMT
Heres what im trying next... 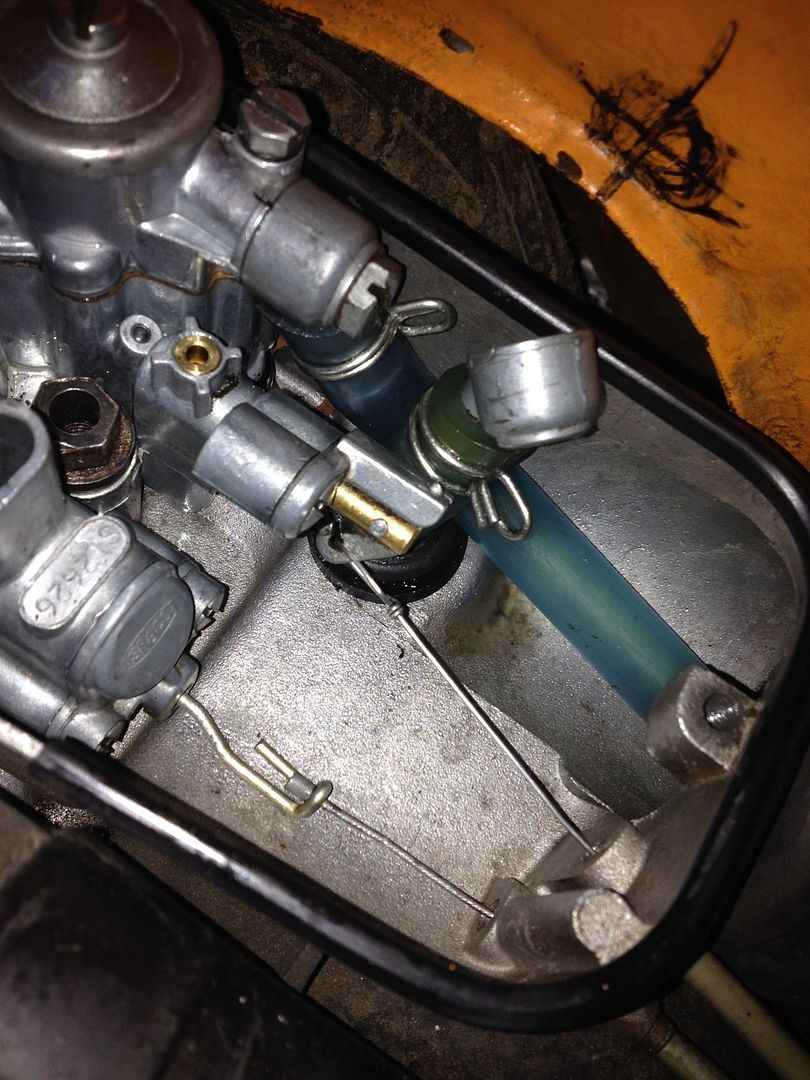 Re routing the fuel pipe through the rubber air duct Worth a go. Hopefully air flow will still be ok!? Spot the stray fibre washer...i didnt! Not until after i started it and noticed fuel 'passing' out the back of the air box! The mark for a hole on the chassis is where id need to route the pipe but it would then pass over the rear wheel. Not so good. This is why i thought id try the air hose route first. |
|
|
|
Post by vespasco on Jun 16, 2015 17:22:42 GMT
Tried it has improved but just a little...i could ride it 1/2 throttle on reserve. The motor doesnt sounded quite right and performance is down a little. I havent actually checked my timing properly as yet..see 'Timing' thread. Everything was retorqued, which it certainly needed. Tbh, im hoping a new spark plug will change things...but i ran out of known good ones. Had a quick plug chop too, @ WOT...and wot was a little down on performance, but at last, the plug was looking browner..although a little glazed! Black glaze! I like it fluffy  thats too hot right? Temps were suprisingly high..ive had it up to 340° so far...and just started to pink but was low on fuel..after a fill up, no more pinking. Im not trying to set a high on temps btw!..just recording them for future reference. Im hoping when i check/adjust my timing properly and change the plug...things may sound better??!! Fingers crossed |
|
|
|
Post by vespasco on Jun 23, 2015 21:17:50 GMT
Further update Trying to get rid of the fuel starvation issues at more than 1/2 throttle with less than 1/2 tank problem...ive done these mods which have definitely made a difference: On a spaco 26 carb with cosa 5.2mm needle float top, ive now drilled both the main jet supply hole and the float bowl supply hole to 3mm. Ive also lowered both of the inlet holes too, simply by using a larger drill bit to kind of chamfer it away. Ive tried other things that didnt really make much difference but these (above) definitely worked for me! I found that the hole in the needle valve seating face is now my limiting factor to good fuel flow but so far, just by doing the mods. above to the supply holes along with the lowering of the main jet supply hole, i was able to ride WOT with only about 1" of fuel left in the tank!!!  Ive also added and enlarged holes in the fuel tank cap but ive yet to actually ride it since doing that. Something else i changed recently..... The cylinder head. I tried my "No.2" head. Theres not actually much difference between this no.2 and the head ive always used, the "No.1" head. The compression and the squish bands aren't too different. Yet, interestingly, the head with less compression and with a slightly smaller squish band (No.2) was the hottest and pinked occasionally whereas the other head didnt. Then again, these were measured with the sensor drilled into the heads and one could be deeper than the other...there was about 25° difference, head no.2 reading the hottest. I did use a sip road mkll to help me solve the problem too, as i think they're more restricted at higher rpm than the mkl id been using so wouldn't use so much fuel!? I dyno'd a few runs and rode it around with the mkll.... What happened to all my hard work I'd done on raising the exhaust port to make it more powerful?? My word that pipe is so different from the mkl ! So slow BUT it has more torque below 5200rpm and somehow a slightly higher top speed, despite the sip mkl having another 33% more power after 5200rpm! After seemingly solving the fuel starvation issue i soon swapped back to the sip mk1. But it sounded different to what i was expecting, felt different, felt/sounded hotter!? Not so much acceleration as i was used to from the sip mkl? I couldnt work it out??? I got back slightly bewildered as to what i could have c**ked up then realised i fitted the pipe that 'I' made, it looks very similar to the sip road! But is a much better to use  Crickey! That thing was shot to bits inside, unless its another mouse trying to hibernate in it! So i actually put the sip mkl back on ! (Doh)! and tried it and YES! The carb mods. as above worked! I need to lap and re torque the head too often but im hoping it will 'settle'. What was that gasket sealing paste for non-gasketed cylinder heads? Does anyone use it with success on problem heads? |
|
|
|
Post by henri on Jun 24, 2015 7:51:16 GMT
theres permatex ultra copper ,which i use as its stocked in local auto factors , an loctite flange sealant (610 i think) , thats got a good rep, an in a recent article in scootering 3 out of 4 tuners/builders asked mentioned wellseal, i use that on classic cars n liquid cooled engines where its the top product n has been for years ,
over in smallie world its evenly divided between loctite n copper gloop really , but methods same with both , apply very thin smear avoiding threads on studs ,clear away any excess let cure for 5-10 mins then torque that sucker up n leave the well alone for 24 hours , H
|
|
|
|
Post by vespasco on Jun 26, 2015 10:35:24 GMT
Leave for 24hrs! Hahaha! Im not sure thats possible!!
I had a quick look at the ultra copper stuff and it says its not suitable for cylinder heads!
I looked at others that were suitable for cylinder heads and it basically seems its the temp range (250°c) and resistance to fuel thats good for cylinder heads.
So based on that i squeezed out the last dregs of the stuff i used on my previous engine cases..Wurth 250 and so far no leaks!
|
|
|
|
Post by sime66 on Jun 26, 2015 10:55:39 GMT
I just realised that maybe you’re talking about the stuff you and I were talking about on my thread – instead of Wurth 250. I ended up getting Hylomar Hylosil Instant Gasket - Clear - 40ml, , Sealant, here: www.ebay.co.uk/itm/311340885047?_trksid=p2057872.m2749.l2648&ssPageName=STRK%3AMEBIDX%3AIT· A new clear instant gasket compound from the manufacturers of Hylomar Universal Blue
· Key Features:
· Permanently flexible
· Resistant to most automotive fluids
· Operating temperature up to 250°C
· Fills gaps up to 4mm
· Engineering grade
· Good adhesion to glass, metal, wood and plastics
Can’t say if it’s right ‘cos I haven’t used it yet, but it fits the bill........... |
|
|
|
Post by henri on Jun 26, 2015 15:54:05 GMT
i saw that aswell , but it does say ok for turbo's , so its fuel resistant an temprature range must be ok , i started using it on advice from smallie tuners , the loctite one is sold as a "flange sealant" not a gasket goo , but they both do the job fine , but like me youve squeezed the last out the nearest tube to hand , i find a vice can always get a tad more goo for ya money . H
|
|
|
|
Post by vespasco on Jul 19, 2015 18:25:45 GMT
Well, i can say for sure i dont get any more head leaks after using the 250° sealant paste  . Recommended! Ive been on a few 100+mile trips, mostly cruising around 55 - 60mph with 'enough' to spare. On B roads, through towns and some quick blasts on main roads i still get around 60mpg. Coming back on dual carriage ways cruising at 70mph for 20 minutes and everything seems and feels good. That would have been a good time to plug chop but i didnt want to stop!! I was enjoying it too much. But i did remember to take a dyno afterwards, on the same road as always..... 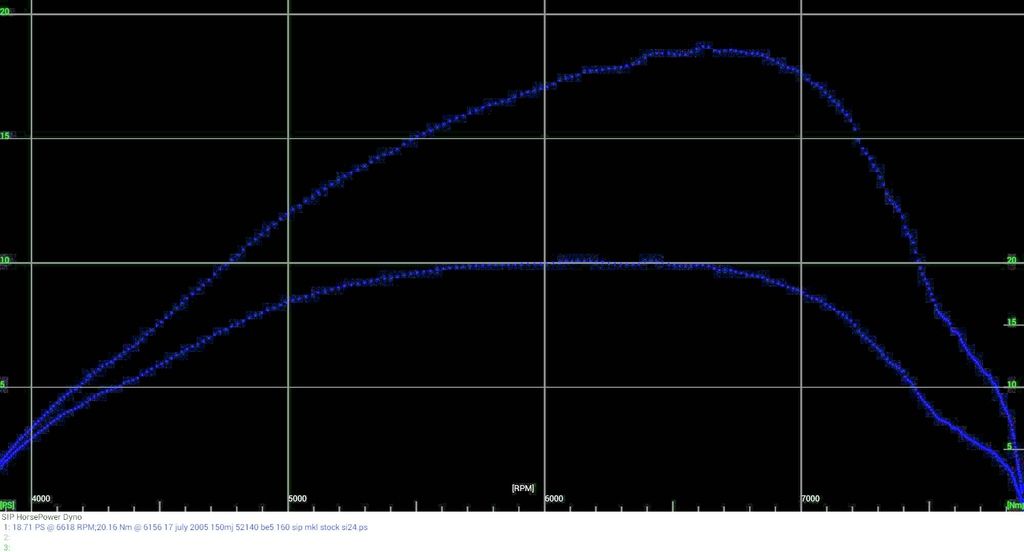 Ive just edited that graph...i didnt input the correct temp and pressure. Although not too much difference. Im happy. It does everything i wanted it to....cruise easiy at 60mph with some to spare....enough to take it past 75mph anyway and temps slowly drop by a couple of degrees or so. It will pull to 55mph in strong head winds. It goes scary silly with a back wind! Ive not tinkered with it lately and its been on motorways which means, i hope, its just about ready for anything  Yippee! |
|
|
|
Post by henri on Jul 19, 2015 18:36:08 GMT
all sounding good , an with enough oompf to surprise a gt300 rider ,nicely done , now ride it til ya break it ,then fix it again , H
|
|
|
|
Post by vespasco on Jul 19, 2015 18:54:55 GMT
|
|
|
|
Post by sime66 on Jul 19, 2015 19:17:03 GMT
Wow! That’s a lairy old dyno graph you’ve posted there too; I’ve overlaid it onto the previous comparison chart you did (March 24th):  Lots of good work since then; good job! Enjoy it  |
|
|
|
Post by vespasco on Jul 19, 2015 19:49:26 GMT
Holy crap! That does look very rewarding doesn't it! Off the graph so to speak! HahHahah I had a few problems when i started drilling out my carb, ironicaly suffering from the effects of fuel starvation, but eventually a stock carb seems to have sorted it all out, with a bit of tweaking to the jets. Ive still not plug chopped yet but temps and the note of the motor whizzing along are nice and im back to feeling confident about stomping once on the kickstart and know it will start, hot or cold. I know i coud tweak it a little more but im too busy enjoying it, so i will resist quite easily  |
|
|
|
Post by henri on Jul 20, 2015 13:43:18 GMT
i'm still confused by the drill carb=fuel starves thing ,totaly anti-logical , scoots eh ,ya got to love em , that graphs pretty good eh , bout to change my phone an thinkin i'll might have a go at micro dyno with new one ,not worth it on old un as microphone is naff . that i got sick of lookin at the stainless exhaust i'd bought managements scoot hangin in garage n welded it n stuck it on mine .now i got to convince her to let me keep it as it makes scoot a joy to ride again .H
|
|
|
|
Post by vespasco on Jul 20, 2015 18:10:18 GMT
I dont get the carb thing either but can honestly say it cured ALL the problems i had. I can only guess that with the carb mods' I'd made, (which does actually improve flow rate btw, ive measured it)! the supply couldnt keep up with demand in the round sediment bowl of the carb top, which caused an air bubble in the fuel pipe. For the purposes of quick calculations, a stock carb top can flow around 12 litres per hour. With an air bubble, fuel still flowed, enough to feed the motor upto around 1/2 throttle but the fuel tank was only supplying 1/2 the usual rate. (Which i measured at around 6.9litres/hour). So driving around town, cruising upto 1/2 throttle, the fuel supply was just enough. After that, This woud cause the problems id been having for sure. Get below 1/2 a tank of fuel, coupled with an air bubble and theres barely enough pressure to feed the carb at all. The best improvement was the different engine cases in ended up with. Those old cases i had before had been split about 3 times for one reason or another. It never did run right/well at that point. Rebuilt virtually the same with newer engine cases and hey presto! I did open up the inlet tract on these newer cases im using now too... After the problems id had jetting it etc i thought id gone too far but i think it works well... I didnt really touch the actual opening of the top inlet or bottom outlet of the tract, just ground away to make a straight line between the two... 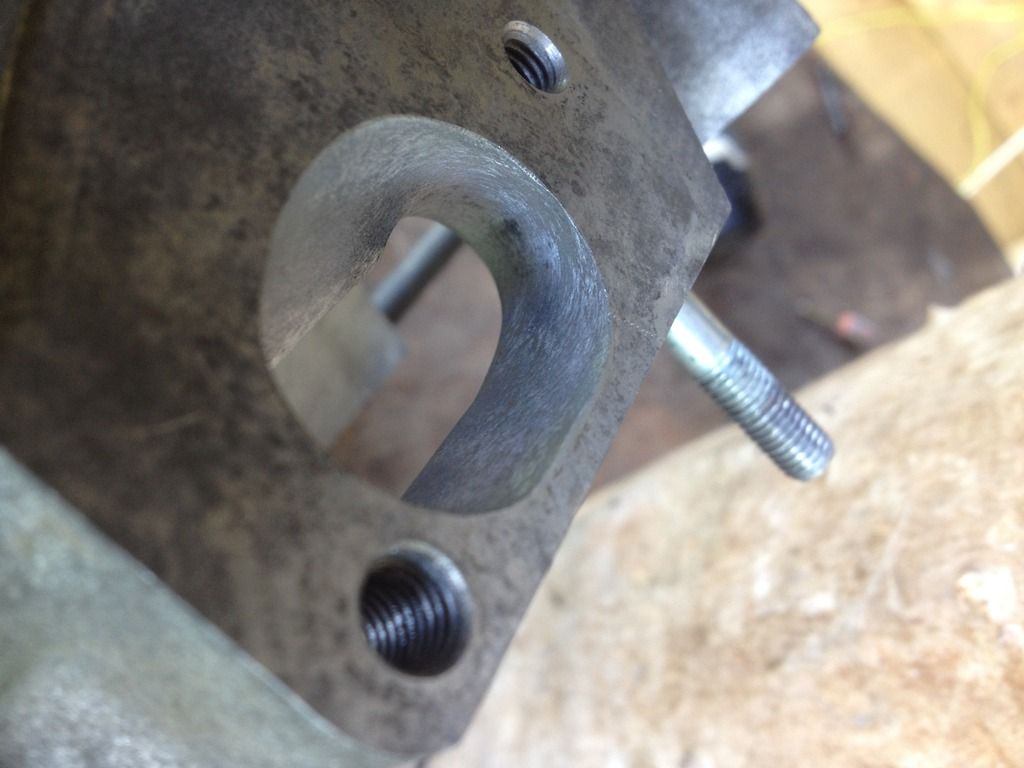 Its nice when a plan comes together and things work well enough to bring a smile on your face. You could always try and bribe your mrs with some Shandy Bass. Or tell exhaust x/y/z will be much better on the cosa  The microdyno just seems to prove what i can see/feel/(touch)/hear. Its on sale at €2.99 atm too!! Its told /learnt me a lot so is quite useful. |
|
|
|
Post by henri on Jul 21, 2015 7:36:07 GMT
the stainless 1 cost 25 quid ,coz it was cracked , exhaust x/y/z would cost lots more ,weve settled on a semi-permanent loan ,so long as i build her a fun/tuned scoot , i agreed as means one of my cut-down smallies can join the permanents ,thinkin the clash scoot ,disc front/pk drum or even my spare cosa forks ,an the polini 130/worb5 spec i'm gatherin bits for now .
just a idea on the carb thing , do you reckon ditching the carb top filter an replacing with a fast flow inline 1 might improve the situation , sounds like it was cavitation causing the slow fuel ,only other cure might be a breather pipe from carb top with outlet higher up than tank top ,all not needed now tho,
H
|
|