|
|
Post by coaster on Sept 30, 2014 16:23:46 GMT
Or swap out your regulator for a 5 pole one if you don't have a battery, and run everything off that. Or look for a cheap full wave rectifier, that's all they are as far as I can see.
Or you can replace the regulator with a Wassel single phase DC regulator (about £25 off ebay) and an alarm type battery and power all lights off DC. I have done this to both my Lambretttas with better lights and DC horn. Another plus is that the lights stay on when the engine dies and there is no flicker. Apart from the regulator change and connecting a battery in parallel with the electrics, you just need to disconnect the lighting coil earth at the stator and connect it to a second lighting feed wire to the regulator.
|
|
|
|
Post by coaster on Sept 22, 2014 12:13:03 GMT
Cheers Henri, I'll explore the fiat colours at Halfords. I'm not expecting to make an invisible repair, I just intend to dab in with a small brush and his L plate will cover it until he passes his test  |
|
|
|
Post by coaster on Sept 21, 2014 22:42:38 GMT
I have always got great results from spending time checking carefully at Halfords pint mix desk. I ask for the old car match paint books and they have lots and I've matched loads of stuff from Royal Enfield army green to Lambretta white and 1923 Ruston Hornsby stationary engine green. The charts have a small paint rectangle with a hole in the middle. You can offer up a piece of the panel and it shows through the hole. Great way to get a paint match. I did that at a paint suppliers in Harlow last week to find the colour of the side panels which were painted in a non-standard shade of metallic grey. The headset top was the same colour so I took that in and spent a bit of time with a folder with hundreds of paint chips in. Unfortunately I don't have access to the scooter nor time to pop in anywhere whilst I'm away from home. |
|
|
|
Post by coaster on Sept 21, 2014 20:25:36 GMT
Hi, hoping that someone can help me with the silver paint code for a 2003 PX200. Unfortunately I forgot to take a note of it and now I'm away from home and need to order some to do a small 'dab in' repair on the legshield next weekend. OR better still,does anyone know a fairly close match to a car colour that I might get a touch up pen for? The area is just above the indicator on one side, the scoot has been dropped on that side and thetop corner bent back. I have managed to gently tap out the crease but about 1" square section of paint has flaked off
The side panel was also damaged but they were in a darker metallic grey which I managed to get a close match for.
I have heard it said that piaggio and fiat colours match but don't know if thatis just a myth??
Any help greatly appreciated.
Cheers Colin |
|
|
|
Post by coaster on Aug 31, 2014 15:22:44 GMT
I believe that some flywheels have a a circlip in a groove inside the opening for the flywheel nut. The idea is that youundo the nut which hits up against the circlip and forces the flywheel off. It is apparently important to fit the circlip with its sharp edge outermost.
|
|
|
|
Post by coaster on Aug 27, 2014 19:59:36 GMT
I would say you can use a block of some sort on probably 70% of most scooters. The inside of the leggies will be one area where you would need a smaller black and the front mudguard would be a fingers only job. I fold the paper a few times for places like recesses in panels and along sharp edges. I spent an hour or sanding down a skim of filler on a PX side panel after first knocking most of the dents out. I sanded using a piece of 3" x 8" timber as I couldn't find either of my rubber sanding blocks and found I could easily do all of the curved surface apart from the recessed strip which required a piece of 1" x 4" batten for the block. I don't see it being any harder when I get on with the wet & dry  |
|
|
|
Post by coaster on Aug 27, 2014 15:49:33 GMT
Not mine H, I'll have a look though |
|
|
|
Post by coaster on Aug 27, 2014 15:46:06 GMT
OK. Thanks to you both. Rather than the guide coat idea, couldn't you just accept another application of stopper to a finish coat. To be honest, I don't remember using the guide coat method when I worked "under the wing" of the pro chap I mentioned before. He was the chief sprayer for a main agent in Manchester at the time. We did about a dozen re-sprays together including a retoration job on a Jag 420G (like MK10). Calling it a guide coat is a bit misleading, what you do is put on a 'misting' coat by holding the spray can about 12" to 18" away from the panel. You are not trying to cover, just to cover the panel in a dappled very thin layer which is easy to flat off to 99% of the surface. The remaining 1% will be the odd low spot or pock mark that you have missed. Paining on top of celly stopper is a real bodge and will eventually sink and show through the top coat. |
|
|
|
Post by coaster on Aug 25, 2014 19:40:36 GMT
Referring back to the 'with or without water' debate, I think the concern about using water is really for sanding filler. Filler as you may know uses talcum powder as the filling medium held in the resin. The talc absorbs water like a sponge and if primer is applied before it evaporates it will cause micro blisters in any paint sprayed on top. Professionals used to use a product called PSF (Polyester Spray Filler) which was basically a thinned down version of body filler and this was notorious for holding water and micro blistering. Oven baking was often employed to make sure it was good and dry before paint. Fortunately 2 pack filler has the same scratch filling properties (it'll fill 80 grit sanding marks) and it doesn't hold water.
|
|
|
|
Post by coaster on Aug 25, 2014 15:17:26 GMT
Although not ideal, I suppose it's acceptable to flat finish coats, apply stopper, and re-finish if something appears due to sinking (or was missed at an earlier stage)  This could be a life-time's work! Good for the soul though. A lot of good advice from henri, but just to add that when you have finished flatting the primer, use a spray can of a dark colour and apply a very dusty coat. Then flat it off (wet), any imperfections or low spots will hold onto the paint and be clearly visible. Apply stopper or small amount of filler, flat and re-prime. You'll know when the primer is smooth enough as it will have a shine to it when held at an angle.
And don't use T Cut on anything, it contains ammonia and can stain the paint, Feracella G3 for restoring shine after wet flatting followed by something milder. McGuires di a good range od compounds and polishes.
|
|
|
|
Post by coaster on Aug 1, 2014 19:27:09 GMT
Very valuable advice re Enfield County and Mickey Spares, their prices are a LOT lower than UK dealers sell them for. I have heard scare stories of pistons disintegrating whilst on tickover within 10 minutes of being put together  but there are hundreds of backstreet outfits in India and it's good to get 1st hand recommendations but there are hundreds of backstreet outfits in India and it's good to get 1st hand recommendations
|
|
|
|
Post by coaster on Aug 1, 2014 14:21:13 GMT
Have you tried disconnecting the green wire that runs up the frame? ......... but it's a good test for continuity on that wire. Just to be clear, that green wire is used to kill the engine by shorting the stator feed to earth via the ignition switch or kill button. If you didn't have continuity, you wouldn't be able to turn the engine off. Removing the wire is a good test though as it removes any possibility that the green wire is shorting to earth or that the ignition switch insulation is breaking down. I don't know about Vespa switches but this is a common problem with Lambretta ignition switches sourced from India  |
|
|
|
Post by coaster on Aug 1, 2014 7:52:05 GMT
Bryno and Henri, many thanks for taking time to research my engine. The Douglas case is staking up but I can assure you that the rear wheel fitted is definitely a 10", the scoot has Shwalbe Racemans fitted front and rear. I daresay the hub isn't on properly, I will investigate when I get a chance. I did look at the gear quadrant as advised and confirm that it has 3 notches. Also tried unsuccessfully to see if I could get a spark out of it but I'm not sure I was connecting the correct stator wire to the coil. Also, how do you set the points with no window in the flywheel 
Rest assured this engine will NOT be staying in the PX, I have already bought an LML125 reed valve electric start engine in bits. I got the seller to ship it directly to a scooter mechanic (good mate). Going off thread but the barrel is damaged and needs replacing and I have seen various adds on fleebay for 5port LML 150cc barrels and piston kits, are these any good and what sort of performance increase should I expect?
Thanks
Guys
Colin |
|
|
|
Post by coaster on Jul 25, 2014 20:41:46 GMT
|
|
|
|
Post by coaster on Jul 25, 2014 6:35:06 GMT
A CHT is a useful tool, I have one on my Lambretta along with an Exhaust Gas Temp (EGT) gauge. The temps from the CHT will be in the 150 - 250 degree Centigrade range. The sensor ring should ideally go under the spark plug (you need to remove the sealing ring on the plug). The problem with the sensors is that they are prone to failure and don't take kindly to frequent removal. Koso gauges (SIP) use a replaceable sensor ring but others especially the cheaper ones require the complete lead to be changed. Some people bolt the sensor to a fin or put it under a cylinder head nut but that will give a lower reading and delay the reading even more.
The temps you quoted look more like Exhaust temps picked up from a prove inserted into the exhaust manifold. Both gauges have their uses but are best when used together. As you say, the CHT reacts a little slowly, it will take several seconds to respond to temp changes whereas the EGT is virtually instant but requires a fair amount of interpretation of the readings to tell if you actually have a problem.
Hope that helps |
|
|
|
Post by coaster on Jul 24, 2014 20:24:00 GMT
That's good to know H, I reckon he'll be wanting it to go faster when he passes his test and fettling the LML will probably be cheaper than sourcing a 200 engine?
colin
|
|
|
|
Post by coaster on Jul 23, 2014 23:53:01 GMT
Depends if you are chasing a higher top speed or faster acceleration. My GTS250i has a 12 x 140 rear tyre, a Mallosi variator and is currently running with 15g rollers. The result is slightly slower acceleration but the revs are much lower for a given speed. BUT, I daren't run it flat out as the belt will rub on the casing and in time the heat will destroy the sump gasket leading to oil leaking into the belt and roller....not good. Had this happen twice now and also had the belt snap twice due to the rubbing. When I get round to it the variator is going to get changed back to standard but with some Dr Pulley sliders instead of rollers.
So, bigger rear tyre and the exhaust would be my advice and keep the drive train standard. If you REALLY want to pursue the Malossi variator you could try using a Malossi belt which I believe is thinner so that it doesn't rub. However, I understand that they only last a couple of thousand miles and a VERY expensive. |
|
|
|
Post by coaster on Jul 23, 2014 21:47:51 GMT
with the indian 1 you'll prob find the coils are same but diameter of base plate is different ,so when coils are bolted on there either to round for the flywheel or too small a diameter . i know thats the case with electronic staters ,same coils n pick ups but diff spacing , reckon it might be bodgeable but loads of work , H I'm on a bit of a scooter work ban at the moment as the mrs wants some work done on the house I'll get back to on this as soon as possible.
The replacement engine that I bought is actually an LML reed valve electric start jobbie in bits having been stripped to find a miss-diagnosed fault. I've had to get it delivered to a scooter mechanic friend to sort out due to the scooter work embargo.
|
|
|
|
Post by coaster on Jul 23, 2014 21:43:00 GMT
No, the engine management system will compensate |
|
|
|
Post by coaster on Jul 22, 2014 19:21:04 GMT
....an sat nav speeds are only accurate on flat straight roads ,they dont allow for elevation changes an measure distance "as the crow flies" ,point to point which averages out the bends . I think that only applied to very early GPS devices, most now incorporate elevation and can 'see' sufficient satellites to give very accurate speeds |
|
|
|
Post by coaster on Jul 22, 2014 17:52:59 GMT
Once again thanks lads, all good info, I'll check out the circlip at the weekend. Re the stator, lets see what's in there, I do have an old Indian Lambretta points stator and I think there is some similarity with the coils/core so with some luck some bodgery could ensue lol
|
|
|
|
Post by coaster on Jul 21, 2014 21:45:30 GMT
It might be a week or two before I get a chance to get on it but I'll keep you all informed;)
|
|
|
|
Post by coaster on Jul 21, 2014 21:16:11 GMT
Thanks again guys for your efforts I really appreciate you taking the time. I have already purchased a PX125 engine in bits (this morning)so the mystery engine will get moved on once I've found out what it is. Seeing as it's in the frame though and turns over nicely with good compression it would be a shame not to get it started....just need to get the flywheel off and see why there are no magneto wires??? I still have my old T5 flywheel puller, anyone know if all Vespa pullers are the same or does the thread size vary?
|
|
|
|
Post by coaster on Jul 20, 2014 22:34:27 GMT
If it's a spare CDI to keep in the tool box as a get you home spare or for 'testing' purposes you can get a cheap Indian one off ebay for less than £10. I bought one recently for £4.99 (make me an offer) with free postage. It arrived in less than a week and works fine, no different to the Ducati one already fitted.
As mentioned above the CDI's are encapsulated in a 'potting' resin which is poured over the circuit board and components. The stuff would have to be chipped off and the process would destroy the components inside.
|
|
|
|
Post by coaster on Jul 20, 2014 20:24:12 GMT
Thanks guys, don't worry, I have an aversion to scrapping anything and will make sure this goes to a good home. I'll try emailing the VVB and see where that goes but I'll probably do that after I've found a PX 125......I'll place an add in the wanted section but does anyone have a spare Vespa or LML kicking around? |
|
|
|
Post by coaster on Jul 20, 2014 15:07:33 GMT
The float will be stuck or something obstructing the float needle valve. A strip down to check would be the best bet but you could try sharp tap with lump of wood on the carb top which might unstick the float (if that's the problem)
|
|
|
|
Post by coaster on Jul 19, 2014 22:49:42 GMT
Thanks sime66, that's amazing sleuthing I'll give that site a look Cheers Colin |
|
|
|
Post by coaster on Jul 19, 2014 20:43:35 GMT
It would be nice if it did have some value, I checked out the VVC website but they don't seem to support non club members. Also, if it was that old, would it fit into a PX frame?
|
|
|
|
Post by coaster on Jul 19, 2014 13:56:06 GMT
Here's a few pics of the scoot and the mystery engine, any thoughts gratefully received. I did try texting the guy that sold it to me via ebay and he said the engine was given to him years ago and had been lying around in his shed ever since...he has no idea what it was from. Scooter as received, the dama ge is on the other side. 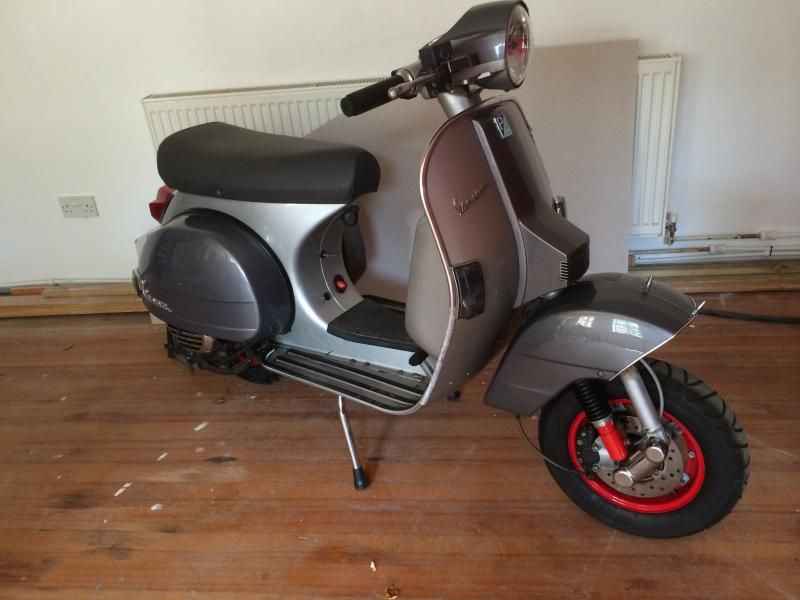 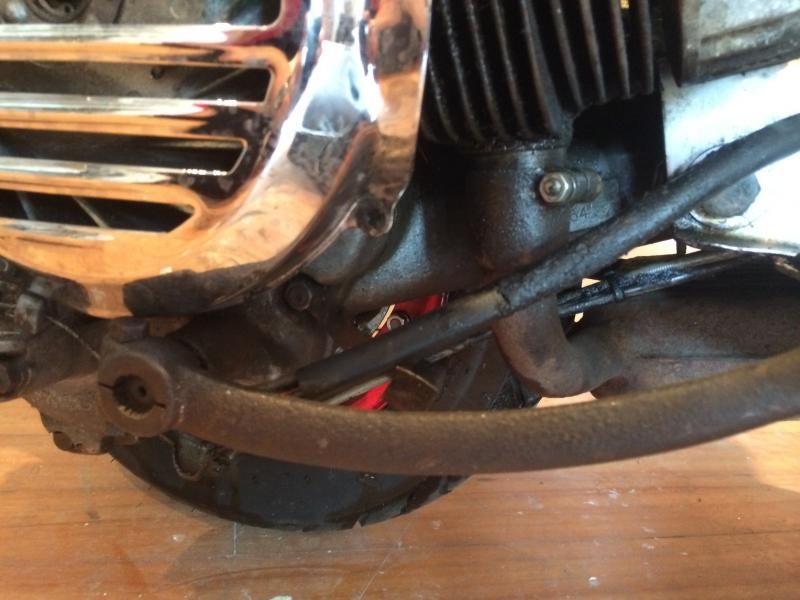 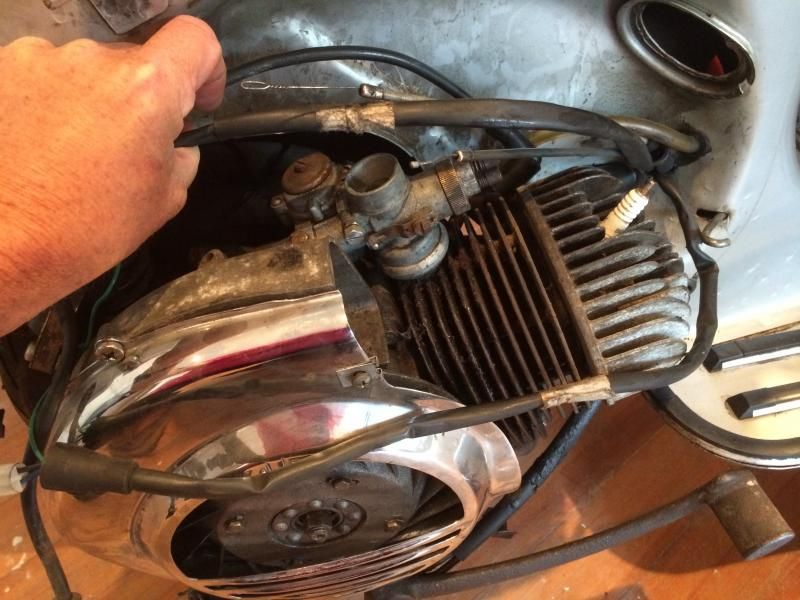 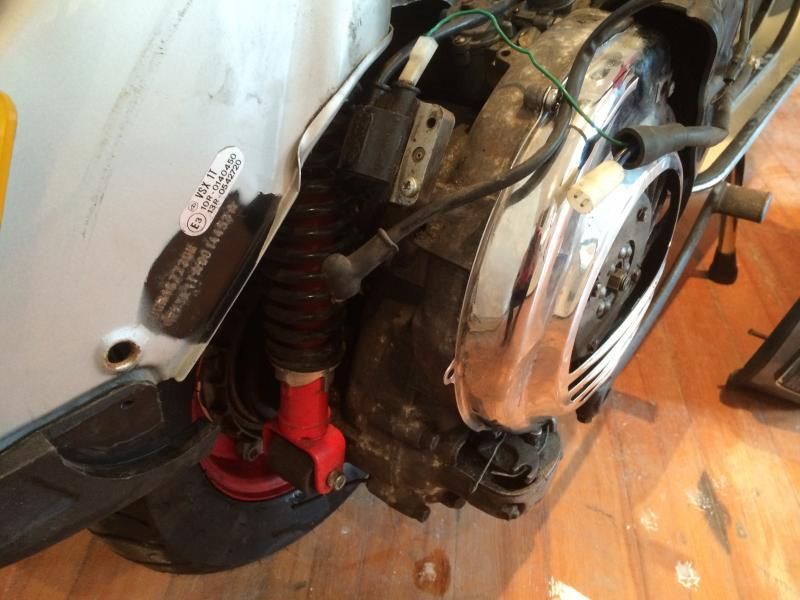 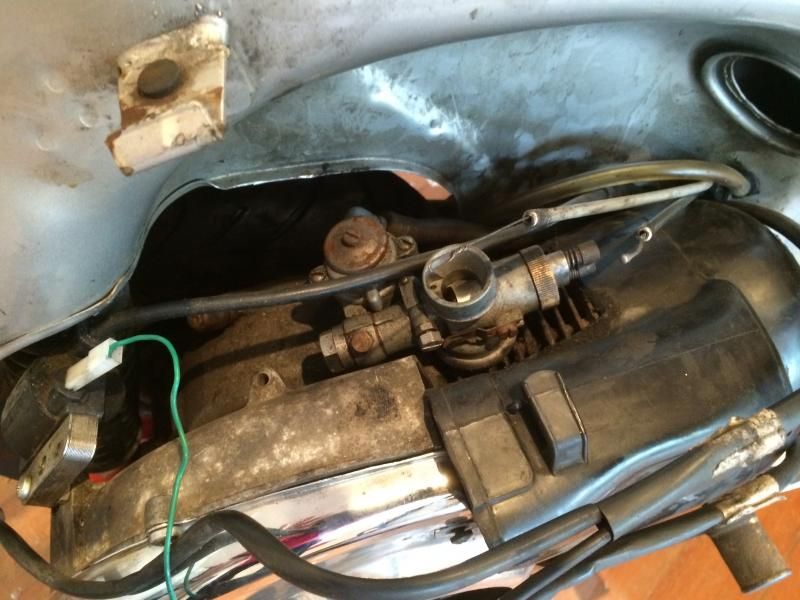 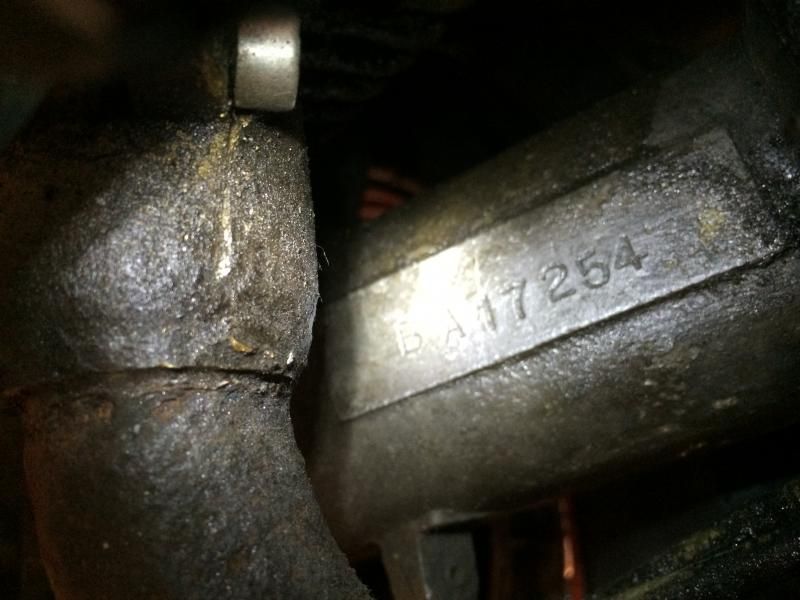 Cheers Colin |
|
|
|
Post by coaster on Jul 19, 2014 12:02:46 GMT
I will post some pics but this is a very tidy bike with only 14.5k miles on the clock. I suspect it's a Cat C or D insurance stolen/recovered jobbie hence the missing 200 lump. I only did an HPI check to make sure it wasn't stolen or under finance. It has Burton Brewers SC on the bottom of the number plate so might be a 'known' scooter. I will need to sort out a heavily scuffed and dented left hand bubble though. |
|


 This could be a life-time's work! Good for the soul though.
  but there are hundreds of backstreet outfits in India and it's good to get 1st hand recommendations


