|
|
Post by sime66 on May 5, 2014 9:16:17 GMT
Following on from Grey Oil (metal) I have no idea how I did this, or how I didn't notice it when I parked up the night before, but here it is; my clutch has ripped itself apart inside the housing. I've only got half of it out, but here's where I'm at:     The housing itself looks OK - that mark that looks like a crack is actually in the casting. The springs and basket came away with the housing. The basket and steels are in a right state. Initially I thought there was no circlip, but I found it and removed it intact. I've lifted the tangs off the clutch nut, but I can't get enough of the castellated tool onto the clutch nut to get enough grip to try to turn it. I'm pausing to have a think; I've either got to get the engine out again, or lay it onto the engine side, which I don't really want to do. Until the knackered clutch is out, I'll still not know the extent of the damage or what caused it. I do tend to accelerate hard, and I'm pretty lardy, but surely it can't just be my riding? Anyway, that's where I'm at with it for now; any ideas very much appreciated - even derogatory! |
|
|
|
Post by glscoot on May 5, 2014 11:30:45 GMT
Your clutch is knackered, beyond repair. The large cir clip has came off due to the basket spreading and therefore would need a band welded around the clutch fingers, but the damage to the slots where the corks and plates fit are so far gone it would not be wise. Im afraid a new clutch is needed.
To remove the nut try a screwdriver and a little persuader, to see if you can get it moving. I would also check the crank and inside the barrel. You may have damaged your crank and therefore scoring on the barrel with a warped crank pushing the piston up and down. If you know what your doing take the engine out.
Gary
|
|
|
|
Post by sime66 on May 5, 2014 12:10:56 GMT
I’ve got no delusions about saving this clutch at all; it's definitely trashed – first job is getting it off and assessing the damage.
I did try encouraging it with a screwdriver and a bit of a tap, but without success.
I was also thinking the best way to tackle it is with the engine out, so your post backs that up, especially as a proper thorough internal inspection will be needed now too.
I can get the engine out myself and take it from there, and also check the crank and barrel – all easier if I can get my hands on it, so I suppose that’s what I’ll do next.
I didn’t think it was going to be good news.
Thanks for helping Gary.
|
|
|
|
Post by sbwnik on May 5, 2014 15:12:20 GMT
Slight good news. I've had exactly the same thing.. And the basket survived. What had happened was that is not built it correctly and had left the gap in the circlip between tangs instead of lined up with one.
Do the plates back in to check.
Now the bad news. That engine needs to come out, seals out and bearings checked. The gearbox needs to come out and the whole lot flushing thoroughly.
|
|
|
|
Post by sime66 on May 5, 2014 15:59:12 GMT
Oh dear.
Looks like I’ve got a lot of work ahead of me before I’m back on the road then.
I’ll post back when I’ve got the rest of the clutch off and had a look around, but I’m not sure I’ll get the time to get the engine out before next weekend.
Lots to think and read about there.
Thanks chaps.
|
|
|
|
Post by sbwnik on May 5, 2014 19:55:00 GMT
Just had a look at the photos now I'm on the computer... Sorry, but the basket is scrap metal  |
|
|
|
Post by sime66 on May 5, 2014 20:09:00 GMT
I noticed you'd said it was OK, but guessed it was because you were on the mobile.
The cost of the clutch is the least of my worries really; it's whether I can tackle the rest of it myself - seals, bearings, crank, inside gearbox is all new territory for me.
Just chewing it over for now, until I can get back to it.
Need to get it indoors and take stock.
|
|
|
|
Post by joey on May 5, 2014 22:28:12 GMT
Had it a couple of times..................
Doesn't look as though anything has disintegrated, all the springs and cups are there, so me, I'd just whack a new clutch in and swill a bit of oil around to clear any swarf.
|
|
|
|
Post by sbwnik on May 5, 2014 23:06:59 GMT
Joey, the colour of the oil says that it's full of metal.
Sime, they're really easy to work on. Just make sure you have the right specialist tools - flywheel holder, clutch holder, flywheel puller, clutch peg tool if its an early clutch - and you're away. I'd strip it right down (Haynes is pretty good, but Sausages DVDs are better) to the bearings and seals, then drop it into a shop to change those. They're not expensive, but you'll save yourself a fortune by doing the strip down and rebuild yourself.
One important tip if you do go down this route.. Grab some paint and put a dab on the outward facing side of each gear as you strip it, in case you get mixed up at some point. Lots of photos helps too.
|
|
|
|
Post by pxguru on May 6, 2014 4:33:59 GMT
Had it a couple of times.................. Doesn't look as though anything has disintegrated, all the springs and cups are there, so me, I'd just whack a new clutch in and swill a bit of oil around to clear any swarf. My vote is with Joey on this one. Just put in a new clutch and change the oil several times in the first few hundred miles. As they are pretty cheap and yours is fully scrap, I would buy a complete already assembled Cosa clutch instead of the standard old style one. Just count the gear teeth on your existing cog before ordering. And you will need the new Cosa type of clutch nut and washer too. |
|
|
|
Post by sime66 on May 6, 2014 6:19:32 GMT
I’m up for doing the job myself, with the forum and Sausage; just need to get my head around the job first and get all the bits ready before I start. As to whether it needs seals and bearings stripped and flushed, when I have the rest of the clutch off, I’ll post some more pictures and see if we can reach a consensus. Always happier when the clever blokes agree! I’m glad you mentioned the type of clutch pxguru, because it was something I was looking into yesterday, and was going to ask later on. I have 21tooth, 3 plate, 6 spring, 108mm standard clutch. The previous one lasted a couple of years, and this last one lasted only six months. I’d like to get to the bottom of why I trashed this one so quickly, and also if and how best to upgrade. Maybe I just need to stop riding like a teenager, but it's only a 180. A 21tooth cosa-style is a straight swap, and a good upgrade then? Also, as I started this new thread after the bank holiday break, I’ll repost the picture of the oil, which I’d left overnight next to a magnet; it shows lots of fine metal as Nik said:  As for the first few hundred miles - I'd be happy to get a hundred miles out of it at all ; last achieved at Woolacombe last year, and nothing but buggeration since!  |
|
|
|
Post by joey on May 6, 2014 6:46:43 GMT
The metal is just swarf, normal in any motor, not happy with the colour of the oil though, it looks contaminated so your seal may have already gone.
That being the case I'd do a strip and change seals/bearings just to be on the safe side.
(Didn't see previous post.)
|
|
|
|
Post by sime66 on May 6, 2014 7:04:52 GMT
I know; it’s well dodgy. This next image is the oil drained before engine removal, when clutch was apparently OK, but not ridden much. Funny thing is they’re both Rockoil (SAE)30 and smell the same, so I’m not sure what it’s contaminated with – other than the metal, which is the other obvious difference between the two. I’ll know more when I have the engine out.  |
|
|
|
Post by sbwnik on May 6, 2014 7:33:28 GMT
If you ride like a hooligan, then stick with the Mk1 type - there's a reason tuners prefer them; greater cork area and stronger springs. The Cosa type is easier and lighter to use though.
|
|
|
|
Post by glscoot on May 6, 2014 10:34:03 GMT
Im not a Cosa clutch fan, they are very poorly made now and the basket expands to easily and the same will happen again. When it comes to clutches, crankshaft, oil seals & bearings buy the best you can afford its money well spent. I agree with Nik strip the engine yourself and put it into a scooter garage to get all the bearings and seals fitted properly. Then do the rebuild yourself, its well worth it. As for the gear cogs when you remove them I use a cable tie to keep them in the correct order.
I would not rely on flushing the debris out by changing the oil a couple of times, one small piece in-between the crankshaft bearings can cause more damage and the engine to lock up. Ive just split a set of casings and taken pictures so will try today and post the process on the forum.
Garage will charge around £100 for the seals & bearings, this should include fitting.
I went for the SIP banded Cosa clutch and pressure plate £200, worth every penny. It is expensive but well worth it.
Gary
|
|
|
|
Post by sime66 on May 6, 2014 11:25:25 GMT
(Nik) Or stop riding like a teenager, when I weigh nearly twice what I did 30 years ago! Cheers, Gary. I was outside getting the engine out, but I’m now leaning towards stripping engine myself, and then getting seals and bearings done elsewhere. I can have a good go at it, and it's about time I split the casings myself. Choosing a clutch can come later, but what Nik said yesterday rang a bell with me, and you’ve reinforced it. I saw a standard SIP clutch (SIP# 93001000), was about £90, compared to a ‘guess-the-origin’ from Beedspeed, which was about £45 – knowing that you get what you pay for always seems to be a chancy affair with scooterist suppliers. I’d happily pay for quality, but most suppliers are very vague about the origins of their stuff. Anyway, back to the plot: It only took ¾ of an hour to get the engine out, but it’s taken another hour fighting the clutch nut, and I still can’t move it. With all my weight on it, it’s still turning off the castellated tool. Anyway, I’ve given that up for the moment before I do more harm than good, and to post findings so far: . That top plate is well-chewed, which corresponds to most of the damage on the basket, but most of the other corks and plates are pretty undamaged, from what I can see with them still stuck in the engine anyway. (It’s all trash; I’m not trying to save anything, just trying to figure out what happened). . There is a little web in the engine casting, which has been catching and rubbing; I’ll ring it on the photo. (That would not be magnetic though, so there's more somewhere, hopefully just the steels). . The other sign of wear that I see with it all still stuck together as it is, seems to be on the soft metal of the cush-drive. . Finally I’ve taken a photo of the castellated nut, and my nut tool; have I just bought a rubbish tool, has it been overtightened - or maybe a washer missing so there's too much stud sticking out, shall I go and see a bloke with a windy gun, or how else might I get this bloomin’ nut off so I can make a start!?    That's me for now; I must wash-up and get on with some other jobs. |
|
|
|
Post by glscoot on May 6, 2014 14:27:12 GMT
Unfortunatley i have already done some of the work, but I will explain how do remove the parts already removed. The engine is a PX125 1. get the engine warm, small run if possible. 2. stall the engine in fourth 3. drain the oil from the engine M7 bolt 11mm socket. will take about 10mins for the oil to drain. 4. remove cylinder cowl, flywheel cowl and selector box cover. 5. remove selector unit, still in 4th gear and cables attached. 6. remove exhaust, should have cooled down by now. 7. remove M7 nuts from cylinder head diagonally & remove head completely 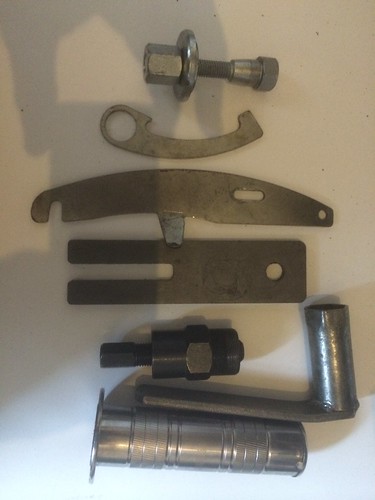 IMG_3582 IMG_3582 by GLscoot, on Flickr tools for the job, from top to bottom clutch compressor clutch holder flywheel holder crankshaft stopper flywheel puller spark plug spanner bearing drift (old grip) You will also need some of this stuff. If you are going to do this its advisable to change the cruciform & gaskets. I don't believe its necessary to change oil seals, woodruff key or bearings, some say change the pushrod as well as the cruciform, thats optional. Copper grease should be used on all engine 'D' bolts and exhaust bolts. 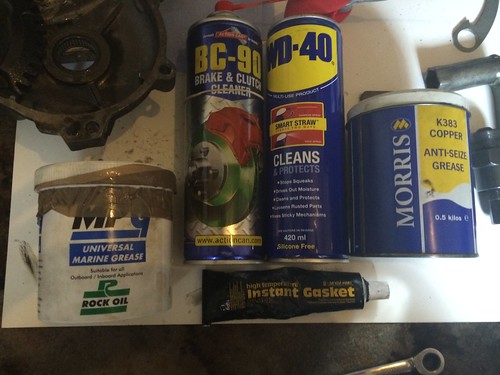 IMG_3606 IMG_3606 by GLscoot, on Flickr 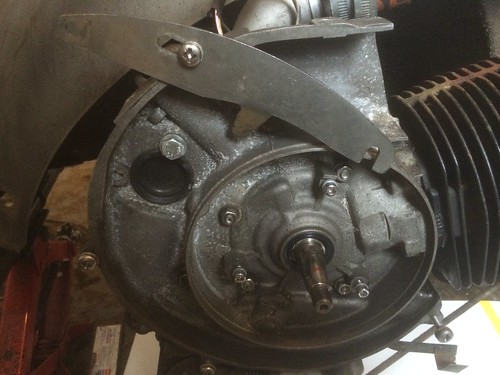 IMG_3584 IMG_3584 by GLscoot, on Flickr to remove flywheel, fit the flywheel holder like so and hook the slot onto one of the fins, tighten screw. now remove flywheel nut 19mm socket and the 'serrated vibration washer' once removed thread the flywheel puller onto the flywheel, hand tight. then using your socket tighten the bolt down on to the crankshaft once you start to feel the flywheel come off release the flywheel holder and again tight the bolt on the puller until you can remove the flywheel. Now you have exposed the stator, unplug all the stator wires from the HT box and junction box.  IMG_3586 IMG_3586 by GLscoot, on Flickr I have marked the casing in red, also mark the stator in the same place, this is so it goes back on in the same position. 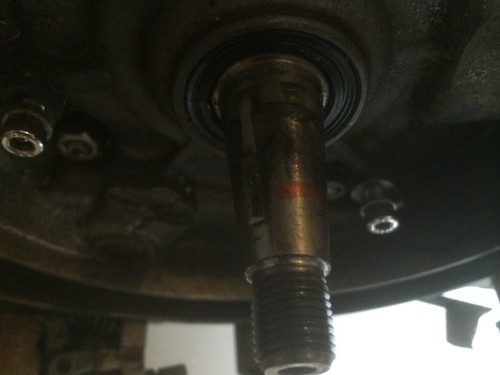 IMG_3585 IMG_3585 by GLscoot, on Flickr woodruff key marked in red, remove this with either a small nail punch/screwdriver tapping the very end of the key. now remove the stator, three screws a bit at a time, feed the wires through the junction box & casing. you should now be left with your engine looking like this  IMG_3579 IMG_3579 by GLscoot, on Flickr now you can start by removing the cylinder head 4 x M7 nuts 11mm socket. once you have removed the cylinder head, remove the two cylinder studs closest to you completely and pull the barrel out by about 20mm or so. now remove the 4 x crankcase nuts M7 diagonally and all of the engine case nuts/D bolts 8 x M7 and please don't forget the one nut/D bolt thats on the opposite way from the rest, it is at the bottom of the casing beside the oil drain bolt. 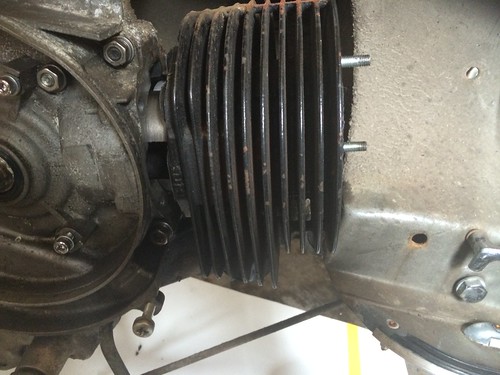 IMG_3589 IMG_3589 by GLscoot, on Flickr  IMG_3591 IMG_3591 by GLscoot, on Flickr Back view of opposite 'D' bolt 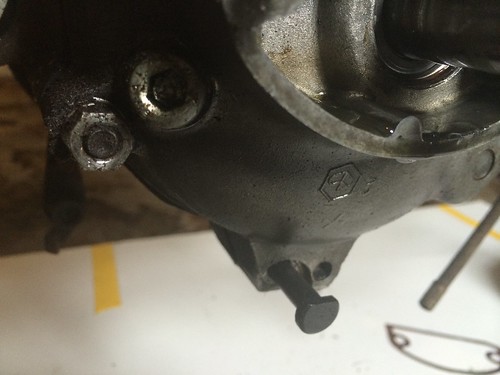 IMG_3594 IMG_3594 by GLscoot, on Flickr Front view of 'D' bolt PLEASE DONT FORGET THIS BOLT i have damaged casings by not removing the nut on this bolt. now you can start by wiggling the kickstart lever until the casing comes loose, you may have to lightly tap the casing at the top with a rubber hammer, you should start to see some drips of oil on the floor. when the casings are apart you will now see a small spring and cog, if they drop on the floor don't worry. 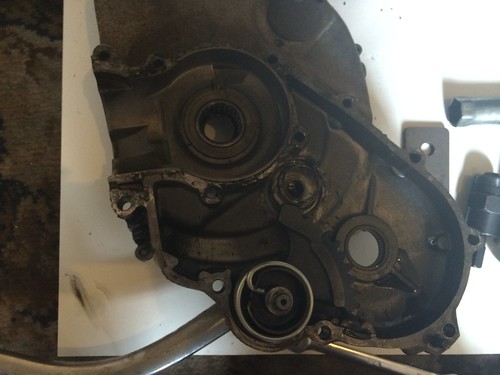 IMG_3596 IMG_3596 by GLscoot, on Flickr Flywheel side should look like this. 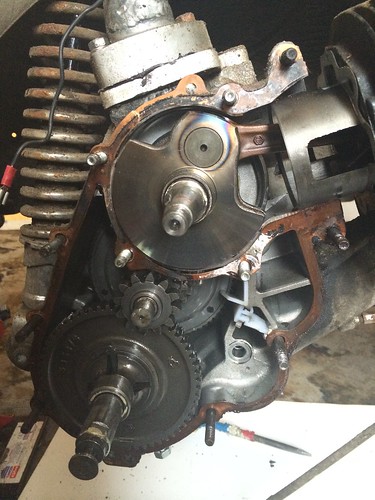 IMG_3601 IMG_3601 by GLscoot, on Flickr Clutch side casing still in the frame. I may have missed some basic tips so sorry, please feel free to add the bits I have missed and any questions are welcome. I will add the clutch, gears, primary drive (xmas tree) at a later date. Its taken longer to post this than it did to split the casings. If you are going to tackle this job, please take your time and use a box to put all nuts,washers, bolts & parts into the box, some also mark on the casings "no oil" just as a reminder to fill the engine up with oil. I use a 50ml syringe for this job. |
|
|
|
Post by glscoot on May 6, 2014 14:30:12 GMT
I posted this on another site so some off it you may want to ignore.
|
|
|
|
Post by glscoot on May 6, 2014 14:32:45 GMT
If the engine is out of the frame and you have removed the carburettor, apply some heat to the castle nut and try and remove with clutch tool. A job for outside as there may be some fuel lurking around, be very careful. Or take the barrel off and use the crankshaft stopper, this will stop the crank turning and then use a flat screwdriver on one of the slots on the nut and tap away with a hammer, after spraying some wd40 on the nut. Make sure all the tabs have been knocked back from the nut, sometimes the mechanic may fold two/three tabs to secure the castle nut. Heres the link to the clutch I'm using www.sip-scootershop.com/en/main/base/Details.aspx?ProductNumber=93404000 |
|
|
|
Post by sime66 on May 6, 2014 15:54:50 GMT
That’s really useful, cheers Gary; I’ll definitely tackle it once I’ve got this clutch nut off. Nothing too scary there. I’ve done the flywheel side already the other week, when I changed the stator, and the casings were also split recently (by others), so nothing should be too seized-up. This would have been good as a separate post, so nik or lucia could make a sticky of it. It might still be possible to cut it and paste as a new post, so your effort isn't lost here. The engine is out, the clutch nut is soaking, I’ll be taking the carb off soon anyway if heat is needed, I’ve already been tapping it more than I’m comfortable with. You can see below where I’ve left screwdriver marks, and it also shows that all tangs are lifted up. I think it’s either the shoulder on the tool itself stopping it going on fully, or that there’s too much depth of crank-shaft thread for the tool to sit over it properly. It isn’t that the force won’t turn it, it’s that I can’t get enough of a grip with this tool to apply enough force. There is a tool without a shoulder that I might try. If it was sitting in the castellations properly it wouldn’t lift when turning.  I looked at your clutch link too, thanks; we’ll see how the budget is looking when I’m ready to put it back together. That's a 115mm & £200 hurts though. It has been a very expensive six months: (The previous) clutch, cruciform & selector rod, rear hub seal and bearings, stator, CDI, exhaust (with seized stud), and now this. The coffers are stating to rattle. A question for later too, is that the SIP write-up there says that a 21 tooth should be for a 200cc, but mines a 21 tooth; I've counted the teeth until I've gone boss-eyed. According to SIP, my 150cc should be a 20 or 22 tooth. don't want to get bogged down with that now, just an observation. All I want for now is to get this nut off and I'll be happy........... |
|
|
|
Post by glscoot on May 6, 2014 16:46:38 GMT
Keep at it with the screwdriver, even if you sheer a couple of the castle nut off. The clutch tools are hopeless, I changed all my clutches to Cosa ones years ago, but now the coda clutches are rubbish. Its just the way it goes, I think nearly everything is made in India now. The clutch cog works in conjunction with your primary, if your primary is 67 a 21th clutch is ok.
If you have soaked the nut in wd40 don't add heat it will burst into flames, not seriously but enough to cause damage. Try heat tomorrow. Sometimes a second hand engine can be cheaper especially if its running and theres no issues, try your local scooter club, someone may help you out. Rebuild your engine over winter and do it right. Something to think about, working second hand engines go for about £400.
I will try and add the rest of the engine tare down later.
Keep at it, you will learn more this way.
Gary
|
|
|
|
Post by sbwnik on May 6, 2014 20:55:34 GMT
From here (Unless you've done the damage yourself) I'd guess that the main problem you're having is that the clutch nut has been reused. NEVER do that. They're a crap design to start with, reusing them makes it worse.
That's an excellent 'How To' GLScoot, but I'd take issue with one small point. To get the selector box off, remove the two 7mm nuts (11mm deep socket)and washers, and then rotate the gear change on the handlebars past fourth gear. This pushes the selector box away from the engine, and lines up the arm for when you put it back together, being almost at right angles to the engine itself.
If it's OK with you, I'll take some time to copy that, edit it slightly, and repost it, giving you credit for it. I'll probably not get chance til next week though.
|
|
|
|
Post by glscoot on May 6, 2014 21:45:58 GMT
nik
not a problem, add or change what you want, as long as it helps guys to get back on the road. i was going to add the gearbox, primary, clutch and crank removal.
gary
|
|
|
|
Post by sime66 on May 7, 2014 3:31:00 GMT
Thanks for the inputs everyone.
Nik, at the risk of repeating myself, this clutch was fitted by a person that I do not use any more for obvious reasons. Once I’ve been inside the gearbox, and re-done the seals and bearings (for which I've just paid), this should be the last time I’m encountering his work before I can get on with mine. For the time being I’m stuck (in this case literally) with the situation as it is. I can see those nuts are crap, and when I get this one off I will be throwing it into the sea as far as I can, not reusing it.
Gaz, I’ve got Haynes, I've got the Sausage DVDs, I've watched them through several times and will again before I start, I agree they are excellent. I’ll be splitting the casings when I’ve got the rest of the clutch off, which is where I’m at with this job. I’m not actually too worried about the next bit yet, and it doesn’t actually seem too bad a job.
Gary, it looks like I’m going to have to either get help with this nut, or use heat. I am not a mechanic, I'm actually a draughtsman by trade; this dirty-hands work is a necessary evil for me, hopefully an economy too, and so I can ride – it's not really a pleasure. I have no experience of heating stuff up to free it, and I have no equipment for it yet. I am happy to learn what I need to keep on the road for myself though. I realise that I need to get any residue petrol out, but are you suggesting flame or hot air? Can you or anyone else reading give a bit of an idiots guide to exactly what I should be using and how. We’ve moved on to splitting the casings before I’ve got this nut off, and that is where I’m stuck for now. If I continue with the screwdriver, there will be nothing left to grab to undo, and I'll be left with the only option being to destroy the nut.
I also do not have the sort of budget you mention; £200 for a clutch, £400 for a spare engine – it’s pricing me out of the game; I’ve spent about £600 already this year and done about 50 miles. £200 last month on the exhaust alone, this is going to be another £200 minimum, and the scooter’s only worth a grand or so. It’s becoming a bit of a money pit.
(Sorry about the winge chaps, but I feel better for it now - where's me hammer!)
|
|
|
|
Post by sime66 on May 7, 2014 5:14:37 GMT
The clutch is still stuck, but to make progress this morning I’ve removed the flywheel/stator, the carb and the head/barrel. I’m posting photos of the barrel; I think it looks OK, not damaged by clutch failure, no scoring. Those rings are 2100 miles old, which is when the head was last off too. These photos are exactly as removed – no cleaning at all: Note also that I’ve never really had a regular enough run in the last six months since the previous clutch, then cruciform, carb, stator, CDI etc... to let it all settle and jet correctly, so I’ve stayed safe. (I’m on a 120 main).          I'm going to repost this one too, which shows the damage inside the clutch-side of the engine: |
|
|
|
Post by glscoot on May 7, 2014 9:30:58 GMT
The barrel looks fine, piston is a little scorched but nothing to worry about. As for the casing damaged by the clutch, thats not a problem either, clean it up with a file or dremel to take the sharp edges of it. You can buy a blow torch from B&Q for about £20 and apply the heat straight onto the nut, you may get a few flames from the oil, but most of the petrol will have evaporated. It may take you a couple of goes, heat it up let it cool down and try and remove the nut, if it doesn't work the first time try again. My worst fears are that its threaded or the woodruff key has been dislodged and seized under the clutch, using heat expands the nut which is made from softer metal than the crankshaft. The piston stopper is a useful tool for removing the nut and short sharp jerks of the ratchet is sometimes better than constant pressure, its a nightmare of a job but you need to stay patient. Have the misses around if you need to kick something  I always use new clutch nut, cylinder studs whenever I remove them from an engine thats done a lot of miles. Carburettor cleaner is excellent for cleaning all the oil and grease off the engine casings. Gary |
|
|
|
Post by pxguru on May 7, 2014 11:47:11 GMT
You have really minced that clutch nut up! The Cosa clutch uses a normal nut. Might be an easy decision now.
The way I do difficult castellated clutch nuts is with a 2 foot long 1/2 inch drive non-rachet bar. Stop the clutch from turning. Put the tool and socket on and take up the slack. Get a mate to put his foot on top of the socket and push down hard. And with a firm steady pull it will undo.
It might go with a blunt chisel and big hammer but less likely. In combination with drilling holes in the nut, it works but makes a big mess.
From here all your barrel and piston look fine to go back after a good clean and polish. Its running a bit black which can mean your oil seal might be poor (they do slowly wear out). As you are now determined to split the engine, assess what bearings need changing. Clutch side oil seal and cruciform is minimum. Most of them will probably be fine to go back after a good clean.
Looking at those tiny ports in your barrel make me want to tune it!
|
|
|
|
Post by sbwnik on May 7, 2014 12:39:40 GMT
Have to disagree about the crux, on an EFL or later engine, they're pretty much bulletproof. On a Mk1 engine they're pretty crap. Have a look at it and see what state it's in though.
If the nut is completely jammed on, then take a drill to the flats between castellations. Start slowly and work up, and do two on opposite sides. Once you've drilled through, take a chisel or punch and hit between the two (to stretch the metal around the holes). It should come off pretty quickly.
|
|
|
|
Post by sime66 on May 7, 2014 13:22:14 GMT
Right then, from the beginning: Got blowtorch, and getting con-rod holder tomorrow/Friday; will try that first if there’s enough nut left to grab. Don’t mind a break from it for a day or two – I was fighting it at 3:00am this morning, and it was winning! If I destroy the nut castellations even more, drilling it had already crossed my mind. (And a bit more whacking to open up holes sounds promising) It is an EFL and it’s a new crux (was before this malarkey), but all the assessment of the inside bits can wait. As can clutch selection. I’ll be getting a thorough list of bits and pieces for the rebuild when I get to it. I wasn’t determined to split the casings before I started; it was the majority view, and I had to make my mind up. I do think it’s sensible now given the inspection, flushing and parts-replacement discussed here. I won’t do it before this clutch’s off though, because it will leave my crank hanging in the breeze. As regards tuning – I just want to ride it a bit for the first time since last summer, I don’t currently give a monkey's about performance; I just want a bit of reliability now, to get where I'm going without constant buggeration and wallet hemorrhaging!! - So my ports are just fine as they are Cracking on – will update when I’ve had another go. Thanks very much everyone. |
|
|
|
Post by henri on May 7, 2014 15:19:35 GMT
hi,dodgy net access where i am means ive been trying to post this for 4 days.sorry.
i guess youve destroyed the castles of the nut by now ,but for tight 1's its sometimes a 2 man job ,1 to push the socket in tight 2nd to take up the slack on at least 2 foot long breaker bar an when tight ,wallop the end of bar with 2 pound hammer.its always worked for me apart from once ,tried drilling still wouldnt budge,as the clutch was scrap went "medieval on its ass" ,grinder an dremelled more access,split nut almost down to threads with cutting disc's on dremel an then obliquily struck it with cold-chisel to split nut an take pressure off,was finger tight then an spun off.
its a bit nerve inducing but sometimes youve got to destroy to fix ,especially when its 1 nut thats holding up the job .before working out ya fustration tho,a session of heat(blow torch/heat gun)wd40 an trying to knock it round with cold chisel an hammer a few times .as its not a bearing surface you can use freeze spray on the shaft when the nut's hot,an alternative is the "dust-off" sprays for keyboards held upside down,make sure there's no flames/people smoking first or it wont freeze but flamethrower.heating the nut an freezing end of shaft might get it looser for you. H
|
|


