|
|
Post by rab on Sept 16, 2014 19:48:56 GMT
arise sir biscuits hehehe
|
|
|
|
Post by bigd on Sept 16, 2014 20:03:46 GMT
Thanks for the biscuit guide Sime, the Oreo is spot on mate, lol Bit of an update, I managed to get half an hour tonight after work to have a look at the Carb and Jetting. Gaz was right about the Carb, 24/24 G The Main Jet is a 125. My Air Filter has a hole drilled in it. 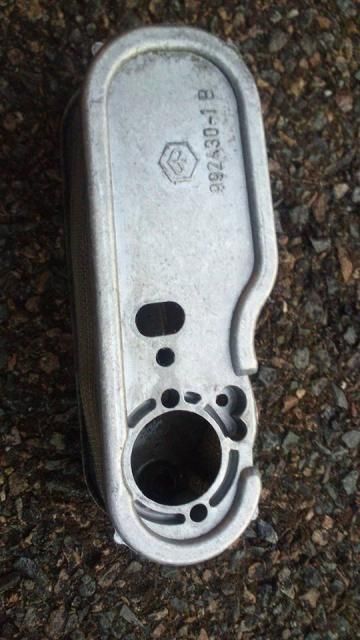 Sime, I think the oil leak is definitly coming from between the carb and casing, I mangaged to tighten the carb down just the slightest wee bit more, with-out over doing it. Thanks H, for the pics of how a plug should look. I have order a new plugs so my next job is to siphon the 40:1 mix out of the tank and put some 50:1 and give it a good run, maybe just go for a good run and run the 40:1 out, petrol never was my favourite tipple!! |
|
|
|
Post by sime66 on Sept 16, 2014 20:15:44 GMT
Sorry about that mate; we got a bit carried away with the malarkey.
I'm going to have a sensible read of your post - it was about time it was steered back on course.
Quickly though: 1) that's a tiny drilling on your filter. 2) changing carb box gasket and flattening your surfaces is quite straight forward, but we can go over that in the morning. 3) i wonder if you need to syphon your tank, or just do a bit of maths and add some petrol - it isn't an exact science really (i might get shot down for that one).
|
|
|
|
Post by henri on Sept 17, 2014 15:53:03 GMT
i see you boys have been havin biscuit fun whilst i wasnt here , agree my 1 is a bit rich tea an i'd be happier with pxguru's digestive colour , an as my doc says cut down the coffea to 3-4 cups a day mines 2 heaped spoons (not necciseraly tea 1's)of coffea an 4 sugars ,no milk as i dont like cows ,they look at me funny . H
|
|
|
|
Post by sime66 on Sept 17, 2014 16:33:01 GMT
We did have a bit of a giggle yesterday, H. But back on standby now to sort Darren out when he's ready....
Glad to see you using the 6 Biscuit Scale - (your reference to Rich Tea and Digestive).
|
|
|
|
Post by sime66 on Sept 17, 2014 16:47:36 GMT
When you get back with your arrowroots, do please bear in mind that this is the DRY 6-Biscuit Scale, and not to be confused with the inferior Dunker's scale, which introduces the undesirable variable of the dunking medium.
|
|
|
|
Post by bigd on Sept 17, 2014 20:58:11 GMT
I got this from the Square Tails Scooter Club International page on Google, it does mention a 125 main jet.
T5 with Malossi 172cc kit
Spark Plug: NGK B9ES
Top Speed: 75mph (average)
Gearing:
4 Speed Constant mesh
Clutch 20tooth (sometimes exchanged for a 21tooth)
Primary gear 68tooth
Primary shaft to rear axle
1st Gear = 12:58
2nd Gear = 13:42
3rd Gear = 17:38
4th Gear = 21:36
Lubrication: 50:1 (2%)
Bore x stroke: 65mm x 52mm (170cm³)
Compression: 11:1
Power: 15bhp at the wheel (based on an average depending on exhaust used)
Timing: 16° BTDC
Carburator: Dell´Orto SI24/24G (most popular choice)
Jets:
Main jet calibrator 120
Mixer tube BE4
Main jet 125 (based on a average)
Slow running jet with air enlarged filter hole(s): 100/100
Slow running jet with standard air filter hole: 50/100 (default)
Starter jet 60
Never heard of Arrowroot before, might just have to hunt them down next time Carol is shopping, lol
|
|
|
|
Post by sime66 on Sept 18, 2014 7:20:21 GMT
Don’t you still need to show us a non-idling plug? You said the one you first posted is probably after idling. You’ve bought new plugs now; it’s got to make sense to put a new (hotter) one in and do a proper plug chop.
Then we can have a more realistic go at getting your jetting sorted.
I’d found the same info as you posted above on the T5 forum pages, and also a similar story on the Scootererotica Forum, so it looks like a 125 isn’t far out, but those are guides; you have to jet for your own scooter.
Has anyone yet got you to check your mixture screw?
Have you sorted your 2T mix?
Have you asked any questions on the Squaretails Forum?
Have you torqued your carb to the figures I directed you to before? – you can’t just tighten it without risking warping it. You may need to lift it up and sort it, but that leak isn’t making you rich.
Let the others confirm, but you’ll get better air if you drill that filter properly, rather than that little hole.
You know your 2T mix is wrong anyway. One way or another your either very rich, or the plug’s wrong, or both, in which case you need to take on the suggestions given; or that plug isn’t giving an accurate picture in which case you need to get a plug chop done on one of your new plugs with the correct 2T mix.
- That’s any spare time this weekend sorted for you; you’re aiming for Digestive.
(I’ve been running slightly rich deliberately since my engine rebuild, so this weekend I’m doing the same job – chopping and jetting).
|
|
|
|
Post by bigd on Sept 18, 2014 15:48:02 GMT
Work is getting in the the way at the minute, there is only about a 1/4 of a tank of 40:1 left, hopefully run that off by the weekend and then I will put the 50:1 mix in and change the plug and hopefully get a bit of plug chopping done on Sunday, Digestive here I come, lol
Simon, I will get back to the leak when I have the right mixture and plug sorted.
|
|
|
|
Post by henri on Sept 18, 2014 16:14:45 GMT
life has a habit off gettin the way eh, if leaks still there it will make mixture n plug choice hard if not impossible ,doubt if ya leaks major as plug showed no signs of leaness , leak=more air=lean mix ,ok, fill up a full tank an the 1/4 at 1/40 mixed in with proper 1/50 should be just about right enuff to start chopping ,
run scoot out n up to heat,change plug in handy lay by to new 1 an your away , from the t5 jettin i found on google you should be close already if memory serves , H
|
|
|
|
Post by bigd on Sept 19, 2014 21:43:31 GMT
Went for a run tonight topped the tank up with 50:1, 20mins in I got a quiet bit of road and give the B9es a chop, looked like custard cream end of the scale, swapped it for a B7es and made my way home, got a chance to chop it but the light was failing to get a good reading, hopefully get a go again over the weekend.
Had a read at a few older posts on plug chopping just to give me an idea on what I should be doing, some good post's when you go digging.
I definitely think the scoot ran a bit better with the 50:1 mix and B7es plug.
|
|
|
|
Post by sime66 on Sept 20, 2014 8:01:45 GMT
I was going to plug chop this morning, but had a look first and decided to leave well alone. This is after a good day’s running over Dartmoor (200km) and a rapid run home on A30, but then left for a week, which is probably why it’s dry. But the colour is good, so I’m leaving it as it is. (See below). I know we like a dark ring at the base of the cone, so I’ll try to get a better photo of that this evening. (see pxguru’s plug). Hope you get somewhere close.   Don’t want to bring it up again, but if you are ending up the lean end of the scale with a 125 main, it might end up being time to sort your carb leak. Anyway, not getting too involved this weekend, want to enjoy the Autumn and get out and about on scoot and bike. Good luck with it; do some photos if you can. |
|
|
|
Post by bigd on Sept 20, 2014 9:07:25 GMT
Cheers Simon, you have a good weekend mate!!
|
|
|
|
Post by pxguru on Sept 20, 2014 10:14:27 GMT
Sime66, Can't quite decide if your plug is too much 2 stroke or not enough compression. Jetting is close enough for being cautious. As is the plug heat rating. You're not running autolube are you? I think you are putting too much oil in. If you use a decent brand then 50:1 two stroke is ample up to 10,000 rpm. no need to add extra, it just messes up the performance  |
|
|
|
Post by sime66 on Sept 20, 2014 10:57:34 GMT
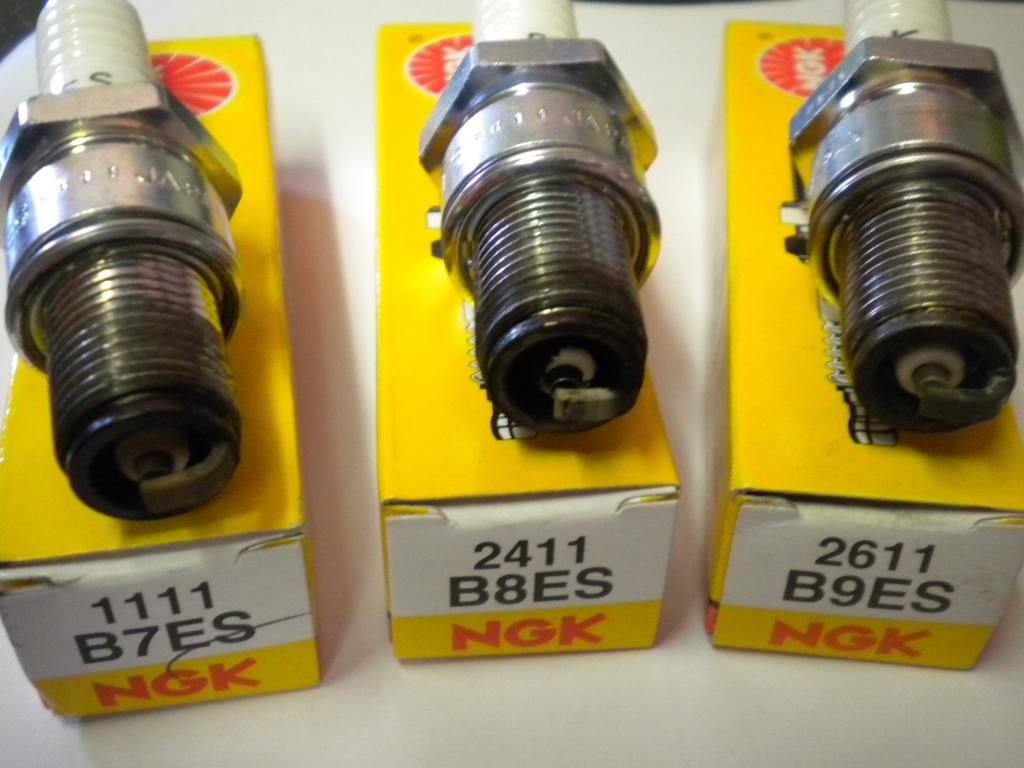
Thanks pxguru, I’m pretty accurate with my jug with the 50:1 2T, so I don’t reckon that’s a problem – I certainly don’t deliberately add more. I'm using Rock Oil fully synthetic. I do need to go round and nip-up/check all my studs after engine build though – and cylinder head, so that’s probably it. (I didn’t do a pressure test – we did all have a debate about it at the time and I know you advise to do it). I haven’t noticed any signs of poor compression though – it’s starting easy, and pulling well. I’ve just drained my oil (1st change since rebuild); it looks a good colour, doesn’t smell of petrol, and I’m just letting it settle down to have a good look at it. should I check my fly-side seal then, based on this? Can I ask what is it about my plug that makes you say that? I’d like to learn to see what you do in it. Here's the three plugs posted recently. Left to Right henri - pxguru - sime66: It would be great to know what you see |
|
|
|
Post by sime66 on Sept 20, 2014 18:21:24 GMT
I’ve just found a can of worms! Pxguru’s magic eye got me curious, so I had a bit of a read-up this evening; there’s a lot more to it than just the colour of the porcelain. There’s a hell of a lot too it, but I’m just starting to pick up some of the info on what else you can read: - Heat range of plug from how many threads are discouloured/burnt. - The timing, from the ground electrode strap - where the discolouring starts and finishes. - The air/fuel mix from the ring at top of threads. - Three bands on the cone for Idle – Mid – WOT (ish) Bit of a diagram:  It’s complicated, and there’s loads of info, and I’m vague because I haven’t read it all – I don’t know how much someone who wants to go well but not go bang needs to know. This more involved stuff probably doesn’t mean much for my plug, which was just pulled out a week later, after a bit of a jolly – just for a quick look, so all I really need to know for now is if there’s anything to worry about that suggests I should look at it again. With this question, and the power/gearing question, I see myself getting dragged into tuning stuff, which might be deeper than I really want to go. Hope you don’t think I’m gatecrashing your thread Darren; it’s good info for several of us though. Chuck the biscuit scale in the bin! |
|
|
|
Post by bigd on Sept 20, 2014 20:27:23 GMT
No worries Simon, I'm glad my spark plug questions has got others thinking and contributing to this thread.
|
|
|
|
Post by pxguru on Sept 21, 2014 4:33:26 GMT
This can of worms diagram I believe to be true and is just relevent to 2 strokes. If you can see the three bands on the insulator cone and a digestive colour on the tip then the jetting is close enough. On a 125/150/180 head the plug goes in at a steep angle and one side is close to the piston and the other isnt. this makes the plug reading difficult. All that shiny black gunk inside your plug ideally should be more matt finish and bourbon coloured. When I said compression I really meant squish clearance. The squish band forces the mixture to mix better and burn more completely. Whats your timing set to? It's nothing to worry yourself about. Just leave it like this and it should go fine for many years yet. Burning better will save fuel though  |
|
|
|
Post by sime66 on Sept 21, 2014 10:49:53 GMT
Thanks pxguru, My Internet is buggered today, so I may not be able to check and answer too well before I lose it again, but I'll make a start. Most of my plugs aren't new, they're cleaned and re-used, so the shiny black inside the plug is probably older than the condition of the rest of the plug, which is recently cleaned and re-gapped before re-use. That might also explain why the top flat ring is particularly clean; it's actually a bit browner all round to the naked eye; the flash has bleached it a bit. I read that it should be even all round, and I see what you say about the angle of the plug - I'd noticed it being uneven on plugs before, but not so much on this plug. My timing is set to I think 19 (it's on my engine rebuild thread, but I might lose my Internet connection if I try to find it). It is set up without strobing; maybe I need to do that properly, maybe this plug, or a better done one can say if I need to. I'll try to check my previous post after sending this.....(Checked 'Stator Overhaul' thread - 19) Squish remains a mystery - one of the many things I know I don't fully understand, but am still unsure how deeply I need to study it. I am more curious than worried - it is running very well. As I said above, I'm torn between curiosity, needing to know, and getting bogged down with technical stuff I'm not sure I need to know - all very interesting, but so much of it. - Will happily leave well alone, and ride it instead of fiddling with it!!  |
|
|
|
Post by henri on Sept 21, 2014 16:08:29 GMT
if me i'd leave it alone aswell sime , for a standard tune or milder kitted scoot the biscuit scale is more than adequate ,the plug analysis chart you posted is more for accurate readings on a dyno or high tuned scoot ,so long as plugs not showing lean a vespa will put up with quite a range of jetting/plugs/timing an not blow up .just wont be at its best ,but as yours is startin well n pulling ok trust ya build an ride it as is, an re-torque ya head nuts at 500 miles just in case ,h
|
|
|
|
Post by sime66 on Sept 21, 2014 17:11:59 GMT
I reckon I’ve got it: If it was a tuned scoot, a skilled tweaker might get something more out of slightly tweaking my timing and squish, which would make my fuel and air mix better, and which would make it burn more completely, which would then give me better economy (and performance I imagine). As it is, from my plug shown, my plug selection is fine and my jetting is fine. My starting and pulling are also good, so for my ‘Dale Winton’ (yes Nik, I remember) of a scoot, I need to worry not a jot, and go off and enjoy myself without burdening my mind with such things. Thanks chaps, now back to sorting bigd……………..how’s it going with yours, mate? (Just out of interest, H – before we move on, my drained oil left overnight from my first change since build, is nice and very dark brown and not separated or smelly, and has a really tiny amount of metal attracted to the magnet, and no other sediment, so all in all, the build seems to have been a success; I have photos, but nothing to show really. (I do now have a bit of a leak at my drain where I stripped the threads before, but I’m monitoring it before deciding how best to tackle it. But this is bigd’s thread; so don’t want to kick that topic off again here, but thanks everyone again for help with all that - after a good run, oil change and plug inspection, I reckon jobs a guddun). |
|
|
|
Post by vespasco on Sept 21, 2014 21:45:33 GMT
Ive finally had a chance to read it all through... Theres not much more left to say really! Great thread Some people even aim the ground strap to give minimum obstruction to the flame front by using different thickness spark plug washers! You can also see an 'V' arrow on the ground strap (on new plugs anyway) ideally it should be central on that strap.. Some say its a timing mark, others, part of the heat range indicator... All those plugs still look pretty damn good. A little too lean for my style of riding but still, pretty damn close/spot on for max performance (without seeing the base of the cone anyway) and more importantly, to your liking I use an iridium plug once the engine is set up nicely. Ill edit in a pic of my plug, just for fun and to even up the richer, more bourbon end of the scale 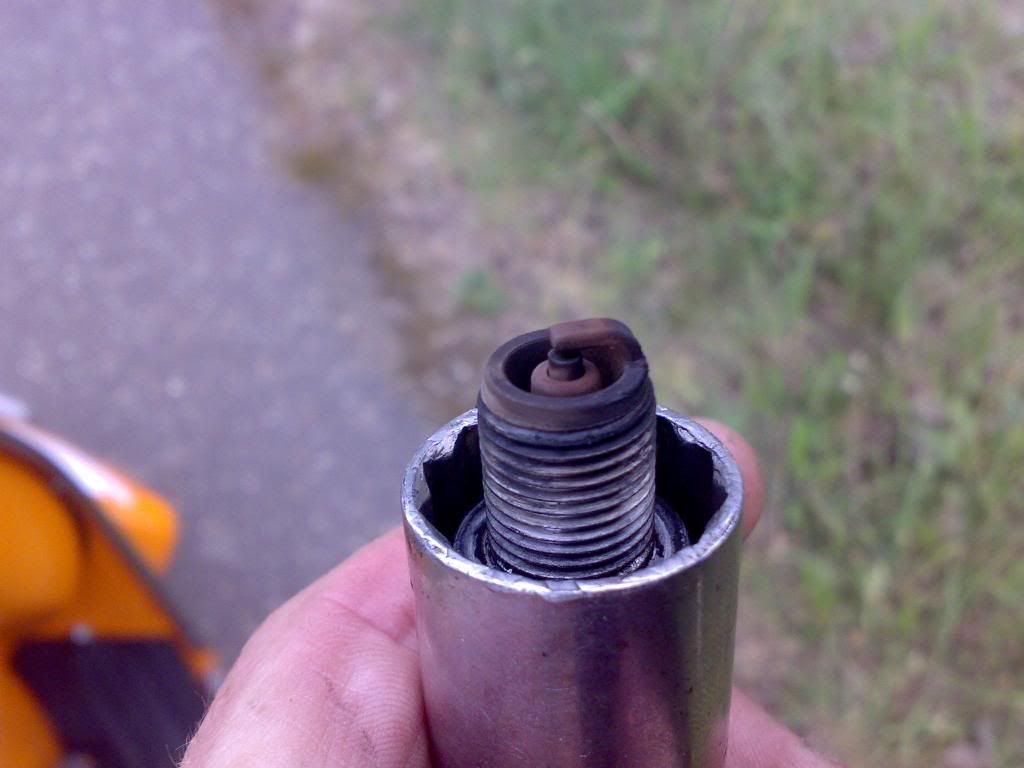 This is how it used to be and I stopped chopping. Ill edit in another pic of how it was today... |
|
|
|
Post by bigd on Sept 22, 2014 17:12:37 GMT
Ok lads something for you to chew over, I done a bit of chopping at the weekend, went out on the country roads with speeds ranging up to 70mph with a bit of WOT, and a good 45mins before chopping, the results are in the picture below, though the B8es was taken out this morning after a short ride to work. Remember I'm a total novice, lol 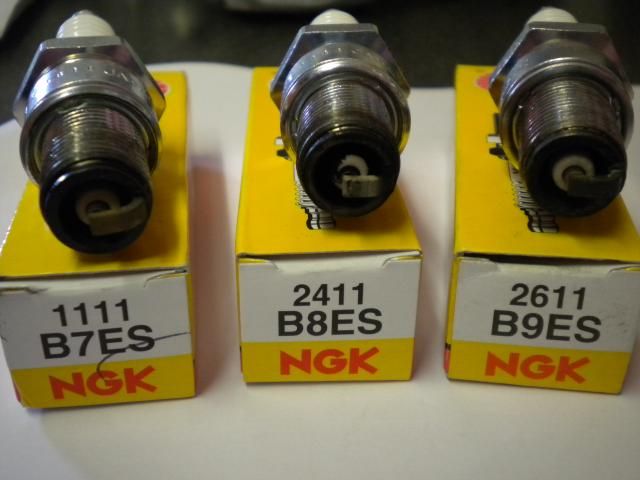 |
|
|
|
Post by vespasco on Sept 22, 2014 19:39:32 GMT
Maybe its because im at looking at it on a phone but the shots are a wee bit dark to see much detail.
However you can see the effects of the heat range of the plug just by lookung at the colour of the first few threads..7 looks ok, 8 not so bad. 9 too cold. Also on the 7 the ground strap/ground electrode looks good, looking at the colour changes and positions of them.
I cant see the detail too closely, its too dark, but what has happened to the ground strap on the 8?
And at what throttle position did you switch off the ignition and pull in the clutch?
|
|
|
|
Post by sime66 on Sept 22, 2014 20:17:57 GMT
I increased the brightness to have a look; they looked lean to me? The image below might work; my internet is being a pig with images:  |
|
|
|
Post by bigd on Sept 22, 2014 21:12:40 GMT
 I thought the looked lean too Simon, the B8es was taken out after a short run this morning and a panic stop in the carpark at work, (before I ran out of breaking distance, lol) |
|
|
|
Post by pxguru on Sept 23, 2014 7:00:29 GMT
I don't like the look of any of them These show the kind of jetting that can cause a sieze up when the weather changes and why we do plug chops. I would up the main jet at least 5 (125 to 130?) and fit a brand new B8ES, as its the one that looks like the right heat rating to me. Once jetted better this could change a little. For anyone taking plug pictures please try to get the bottom of the insulator cone in view. |
|
|
|
Post by sime66 on Sept 23, 2014 9:36:23 GMT
I'm going to say it: Before BigD starts jetting, have any of you proper-clever chaps got any views on this carb leak? Seems to me that needs sorting before the jetting? Just a thought, then I'll stop mentioning it. (Mine went bang mid-winter (in the snow actually) after a long summer riding all over the country thinking she was running lovely when she was lean and waiting to seize - cold air is denser, BigD, so the same volume of air is a leaner mix).....  |
|
|
|
Post by bigd on Sept 23, 2014 11:00:59 GMT
I got a new gasket set so hopefully get it sorted over the next week or so, the oil seems to be coming from between the top of the casing and the underside of the airbox.
Will try and get a few pictures up before I start.
|
|
|
|
Post by sime66 on Sept 23, 2014 11:31:45 GMT
Sausage shows you how to disconnect all the carb bits at the beginning of the first disc of the engine rebuild DVD. You might need to get ‘crafty’ and make your own gaskets. Thicker gaskets will save you over tightening the carb down and risking warping it. Some time spent prepping it to get surfaces flat and smooth (as described in these threads below) is time well spent. Here’s when I did mine – including bollocking received from Bryno for state of it as it was, and the cleaning up I did before refitting (before and after photos): vespa.proboards.com/thread/3724/cutting-out-idling-revving-ownMore photos here: www.flickr.com/photos/124362908@N02/14157014549/Made my own gaskets after discussing it with the chaps here: vespa.proboards.com/thread/3257/inaccurate-carb-gasketsCAREFUL - not to drop anything into the crank case!! |
|


