|
|
Post by sime66 on Oct 30, 2014 6:15:12 GMT
I think I went a bit off piste there with that one vespasco; been clutching at the straw that broke the camel’s back to get this right. As the evening went on and I read a bit more I realised I was probably wrong, but left it there for confirmation either way; maybe to exclude it really. If we’re leading each other astray it might be time to ask The Guru to put us out of our misery, or give us a final whopper of a clue; I’m certainly going to stop guessing until I’ve done some more reading, which I do have two hours for this morning because I’ve got up just a few hours after you’ve gone to bed by look of your post time. I’m now sure there is a power gain from getting the deck height raised for optimum transfer port timing; I don’t know what it is though, or what the figures are. I also don't know if that is getting it to DR design, or an improvement on it either. I did read last night that there is a power gain from raising the exhaust timing, and then setting the transfer to suit, but I’ll have to find it again and see if it’s relevant. It is so easy to follow someone else’s logic, accept it, and be led away from, rather than towards the correct information. Or even follow your own (incorrect) logic, and lead yourself astray, as I did last night. I haven’t measured my piston or barrel, nor will I before we have this sorted, so it’s theoretical values, but I couldn’t see how the static deck height and squish figures H gave yesterday ( “believe the "stock " deck height of vespas is 0 , as in not below or above ,but with piaggio manufacturing tolerances it can be 0 to -1mm , giving squishes from 1.5mm to 3mm ,with the tendency of the engines ive measured towards the later”) left any room for raising the barrel without the squish ending up too big, and I knew pxguru wasn’t talking about adjustments at that mating surface (which is why I made the point about that surface in my post), so I couldn’t see just raising the deck as viable, although I also thought, from earlier, that’s what we were looking at – then I went awanderin’ a got lost………….. (Maybe I misread the –1 as being under, but I’m not sure; I thought I had it until I tried to make those figures work (for example the 1mm changed my 19° to 13.26°, but my squish was too big? - I'm leaving that in, but it might be nonsense 'cos I've made the calculator, but don't yet know how to apply it). ((I put your 124° into my calc.: =47.130mm, but with -1mm, 46.130mm=121.6°; does that help anything? I'm getting muddled between a linear measurement and a duration, I think, but how can a duration be just one number? Or is that either side of TDC? or half either side? Each nugget of info adds to the confusion for me at the moment))** I'm not at all happy with that lot - "degrees and time are the same thing", but what is 124°? Time? 124/360°? From what to what?My thinking was that raising the barrel increases the squish, and if there’s already a negative static head clearance (deck higher than TDC?) and a large squish, then you can’t just raise the barrel, can you? But I don’t think that can be right either. It’s definitely time to stop guessing, do some reading, and see what comes up here too. I’ll add to this if I find anything helpful, but no more wild guesses! – It’s a good way to learn and remember stuff, rather than just being given the answer and accepting it, but not so good if the guesses lead others astray. In your thread I read “ what is optimum transfer opening/closing duration? and how is optimum determined ?”, and I thought that must be exactly what we need to know, but then you wrote “ And thats not the right question as i cant imagne how it would be answered”, so then it becomes clear that I’m lost. I think even if pxguru gave you the answer, I wouldn’t necessarily follow it straight away, anyway; you lot are all several/many, many steps ahead of me, and when I catch up you move on. – Gone as far as I can with logic; time for books… It is a good thread, went backwards last night though, and I've got well muddled with ° now, but if we end up thrashing out as many topics as we can like this without going mad, it's going to be a really worthwhile job.  Afterthought; pxguru, he say: "When it comes to transfer ports, plus or minus a few degrees really notices and this is no big distance"meditate on that.... |
|
|
|
Post by pxguru on Oct 30, 2014 10:51:58 GMT
You have both pretty much got to the crucial detail now. If you are someone who just gets stuff out of boxes and bolts it on then what we are discussing here doesn't really concern you and your scooter will have the performance that luck will provide.
I have said this is a few threads before but when it comes to porting there is no luck.
The point of this thread, is that the number one priority when fitting any new barrel to any new engine is to have the transfer degrees set to where they should be. The engine tolerances all add up and are not under the control of DR (or any kit) and are really very important to the performance and should not be left to chance.
In practical terms a kit should be dry fitted, measured and adjusted. With kits it generally means how many base gaskets to fit. Once the transfer ports are set up, then everything else should be set and adjusted from this datum. As you say this is not tuning but it is just a part of blue printing process. Things like squish clearance and compression are very relevant but not the first or second priority. Exhaust choice, carb choice, gearing and rotary inlet timing are also on the list but not right at the top of it.
The big question is what should the transfer duration be? (and on standard DR this is not 124 degrees!)
|
|
|
|
Post by henri on Oct 30, 2014 10:59:33 GMT
this is why i try n stay away from in-depth tuning ,it can seriously affect ya mental health an seriously "twist ya noodle" .
what i was meaning about deck height n squish was there actually 2 parts of the process but closely related , if ya going with ports as dr intended your just checking squish to make sure its in the right range not with intent to change it, you measure deck height along with port timings to see where they are an what work is needed/possible to get the "tune" your aiming for.then after that squish to see if further head work is needed to bring squish back where its wanted .
sime ya can check squish with engine in frame quite quickly ,barrel cowling off, loosen ya head n move it as far up studs as poss an then its fiddly but poss to tape a twisted bit of solder on piston crown , head back on ,torqued n 1 turn off engine ,retrieve all the solder n tape an measure thickness ,
it is easier done by removing studs ,but studs are used coz means less damage from a steel thread going into a ali casting , if there put in an out often it causes damage to threads an can cause high spots where the ali around thread hole is pulled up,studs are best put in once with locker n left in ,
an gaz as your still a lad ,i'll explain "middle" to ya ,(ya dad shud ov already) when i get a signed note from ya mum/missus or responsible adult in charge ,it will be worth it mate as theres detailed drawings an everything , H
(thats for the fat/biscuits jokes)
|
|
|
|
Post by pxguru on Oct 30, 2014 11:21:06 GMT
H's way is accurate but here is the laziest way there is to check the squish clearance. This is just a rough check but good enough. Get some solder that's about 1mm diameter. Reel off about a foot and fold in half and twist together. Take out the spark plug. Turn the flywheel clockwise by hand until half inch from the TDC (or you can see it with a torch) . Insert solder until it touches the bore on the far side. Turn fly wheel past TDC. Measure with vernier or similar. Job done.
|
|
|
|
Post by sime66 on Oct 30, 2014 12:03:43 GMT
I read somewhere last night, the three priorities in order; I’ll try to find it again later. Anyway it is from the horses mouth that “the number one priority when fitting any new barrel to any new engine is to have the transfer degrees set to where they should be”. Where that is, I’ll try to find out later. (But we have also established why we need to know the Static Deck Height in those figures.) I think it's symmetrical, so I'm thinking it's half the duration, when we settle on one, as an angle either side of TDC, which can be converted to mm. Also, I’ve got my head round transfer duration as opposed to timing. (I got in a right muddle before). I took a different approach this morning, just so I can get the hang of degrees, timing, duration and distance. I used vespasco’s figures from the other thread, (doesn’t matter if they’re not accurate; it was the exercise that mattered, and I can edit it pretty easily anyway), got mm from my calc, and I did a diagram similar to those I’ve seen. Hopefully showing degrees timing, degrees duration, and mm (in the table).  If it’s sensible I found it helpful, in any case I’m going to try to read, not post for a while to see what happens. I do note, though, that those figures gave a transfer duration of 127º. I went on to see what I could find about transfer port duration and found this: www.dragonfly75.com/motorbike/portdurations.htmlWhich says this:  Which suggests that 124º is too much (for a standard DR), and vespasco’s previous 127º was for his high revver. I don't know if there are better, or Vespa specific numbers elsewhere, and I’m guessing again anyway without reading, and I’m out of time, and my brain hurts! Got squish measuring sorted too, going to do a list of tools etc. sometime - not my priority though; understanding it is. (you posted while I was tidying mine). |
|
|
|
Post by sime66 on Oct 30, 2014 23:29:24 GMT
I might tidy this up in the morning, after another read and check of understanding it correctly, but I thought I'd get something down in case anyone is doing the late/early shift:
I’ve been reading a bit of Jennings’s Two-Stroke Tuner’s Handbook tonight – page 75 onwards, ‘Port Timing’.
I don’t think the answer to the transfer port timing question is any arbitrary number of degrees of duration, I think it is more complicated.
Firstly I think calculations are needed that include, the port cross-sectional area, so cylinder port mapping needs to be put on the list of measuring jobs to do first.
There’s then some Time-Area calculation(s) including port area, cylinder volume, and revs, and also calculating actual time from degrees for whatever revs.
I’m not going to try to write-out or understand those calculations now; they’re in Jennings; I haven’t tried to follow them yet, and I don’t know how much, or how complex we need to go to answer this Transfer Port Duration question, but to simplify it;
– The answer is that there isn’t just a simple answer (as just saying xxx° Transfer Port Duration)
Those little tables that give revs against transfer port degrees don’t account for cylinder volumes or port cross-sectional areas.
Edit/Addition:
I just stumbled on that bit above whilst I was printing it out to read last night. That lot above caught my eye, and seemed complicated, but made sense, but a quick cross-check with Graham Bell this morning seems to concentrate on exhaust port duration for revs first, then longer transfer port times ‘for cylinder filling’ at those higher revs. I haven’t yet come across his mention of port cross-sectional area, or cylinder volume, but they must be there. There’s 40 complicated pages; I don’t know how much is necessary and how much is too complicated or race-specific, and anyway it’s going to take ages to wade through, and I’m wary about getting bogged down in either book unnecessarily. I won’t copy the tables he gives here; they’re in the book, they might not be relevant, but there are tables (which must mean there’s formulae somewhere – which maybe can be adapted/simplified for our needs?) for:
Engine size – revs – exhaust port duration
& then
revs – transfer port duration.
That’s it for now; it’s too easy to get sucked in and lose too much time on this stuff.
I still think it's not as simple as just a number, but I think (and hope) it isn't quite as complicated as these two books; I'm pretty sure port area, cylinder size and required/target revs are needed though.
Should we start from a standard engine, say my PX150, with known capacity and revs (standard), and measurable Transfer Port Duration; and then, adding a DR177, use the known increase in capacity, the measurable difference in transfer port areas, and the desired increase in revs, and go from there to establish the required increase in Transfer Port Duration, then calculate the distance? Maybe that adds back in Piaggio's manufacturing tolerances though, so probably not.
|
|
|
|
Post by henri on Oct 31, 2014 12:36:44 GMT
yep, reckon ya getting it now , everytime ya think ya gettin a handle on it theres a new wrinkle pops up, your discovery of port areas/shapes opens up a new can of worms ,with calculations on expansion/gas flow speed/exhaust harmonics that start to make the maths so far seem playskool level,
back in 80's i bought a £25 texas scientific calculater then took 1 day to read destructions an 2 to program in the equations needed ,prob get a program/app for it now , pretty sure theres free software out there for setting up a "flow-table" ,to tune inlet/cylinder/exhaust configurations .its pretty "rocket science"tho, reckon your winters "fireside/bedtime" readings sorted for this cold-session . H
|
|
|
|
Post by pxguru on Oct 31, 2014 13:49:50 GMT
You are certainly right about the not that easy. That Jennings book was actually published in 1973. It does contain good stuff but is has quite a few misleading old ideas thrown in amongst the good stuff and mor importantly the overlooked areas. You are getting a bit to far into conceptual tuning than just coming up with a figure to set your barrel to. Was trying to keep this simple and practical  As H said earlier. Might be easier if you find out where you are set to and decide how good it is. |
|
|
|
Post by sime66 on Oct 31, 2014 15:25:12 GMT
OK, you reckon I’ve gone as far as I can without getting hands dirty; that’s not as I’d planned to do immediately, but if it needs doing before I can make progress then so be it. Remember though, for me anyway, it was more about understanding what you meant rather than deciding to do it; using my scooter as the practical application for learning wasn’t really what I had intended yet, and not over winter when I want to use the scooter, don’t want to be riding ‘trial-and-error’, and when working in the garden is a drag, which is why before I was hoping to get a different motor to play with, rather than experimenting on my ride. I’m also actually quite happy with it running as it is. I also definitely don’t want to deliberately leave my scooter unrideable at any time now anyway, so jobs need planning, completing and putting back together in one go; I can’t just shut the shed door and nip off to pop up the local tool shop or for a read-up – it’s planning jobs, making sure I have everything I need, carrying tools etc downstairs and doing it in the front garden when there’s likely to be enough dry daylight hours, packing up, tidying up, leaving the scooter rideable, and bringing everything back indoors at the end of each session. I will need to do the following measuring jobs: · Squish Height · Static Deck Height · Cylinder Port Map (rubbing) · Anything with the head while I’m at it? I don’t want to have to take it apart again. · Same question re piston while I’m there; I have an old one I can use too. I’ll need to buy a vernier gauge and solder, whatever I need to clamp barrel down, I’ve got feeler gauges; I’ll add to that list as I go. Onto doing the jobs then; squish I’m clear on, deck height I guess I can use flywheel to hold it at TDC and use feeler gauges as you described before, cylinder rubbings are easier off the engine I imagine, so before I start I need to think about gaskets, especially if I’m likely to be ending up needing some different thicknesses or types. How do I clamp/toque barrel down with head off, without damaging it? I want to think each job through before I tackle them all as one session. Also, you will appreciate, when reading a technical book, I have no means of judging when it’s got too technical, or out of date, or missing new-thinking, or more specific to a different two-stroke application; it is very easy to spend time on the wrong stuff; how long it takes me doesn’t matter, but best to try to keep time spent relevant to the task. H, I had one of those too, a Casio, I wrote stuff like little duct and pipe sizing programs on it in ‘Basic’ – happy days, day release – work and Tech College; we just had computers in College, but no one had one at home. Then a few years later my drawing office was revolutionised with CAD. I was freelance by then, so I spent £3000 (in 1989) on a computer to learn CAD for work, and I’ve been stuck in front of a bleedin’ computer ever since….. (found an old Casio here:) www.ebay.co.uk/itm/Vintage-Programmable-Calculator-Casio-FX-802P-Very-RARE-/221352961121?pt=Vintage_Electronics_R2&hash=item3389aa2461It was The Mutts Nutts in it’s day; now it’s 10 seconds to download an app onto your ‘phone, but no understanding of where the numbers come from, which is why I like starting from scratch and working through it slowly and learning it, which probably makes me tend towards sussing the theory before diving in. Always cheaper to screw up the paper and start again! |
|
|
|
Post by vespasco on Oct 31, 2014 19:39:27 GMT
i think most of the answers are already there from the various previous posts... and now we have it!! it just leads us to asking the same question i asked before, what is/how to find optimum transfer timing? (on any kit)? the reason i didnt know if it can be answered (but im still going to wait as there will be one is because it would be different for every cylinder porting design and every different set up. hence the magic number cannot really be given. I have no experience with the DR kit so have no idea of its timings, I can only think along the lines of my Pinasco atm...even so we'd like to know what the ideal transfer timings are for any kit and/or how to find them. If we are lucky we will have the complete spec form the manufacturers and this will tell us the max power at what revs and what timings to use, what squish they designed for..etc.. so how do we find out on an 'unknown'....? We can measure everything, take port map rubbings, work out the timings/durations but what do we compare the results to? when pxguru ji (i find it difficult not to add 'Ji' to the end of guru...(its a respectful term))! mentioned making the transfer timings (not the exhaust port/covered rings) the no.1 priority when setting up the barrel, i pictured in my mind, setting the transfers up the same way as i did to my exhaust, by physically looking, measuring, adjusting base gasket to suit but that was easy as the piston was at BDC... thats a definate datum point... (so i figured if the exhaust port/piston is at its optimum and the cylinder/piston is designed to suit each other then the transfers will line up, as well as the squish etc etc - but thats just hoping really) ..... So its the same question... where should the piston actually be for optimium power (in degrees or mm, however you want to measure) when it opens/closes the transfers? what would be a good starting point and why? Do we have a pint at the Trial & Error??!! can we go by the rev/duration chart above as a base point and tweak from there? or is it all done with maths to obtain your desired rev range/peak power range. this is pretty much as far as i got last time when i was originally blue printing my engine/kit and never really found definate answers (or couldnt understand them)! or gave up thinking about all the formulas and carried on building it!! most of the figures i found about were for Malossi and wasnt relevant for my kit. so i settled on the exhaust port/covered ring method and by chance or design the static deck height seemed perfect too (0.4mm on mine).... that was the cylinder/deck height set up for me. job done. next i had to re design a cylinder head!! (im sure this subject will come up later) so next time i rebuild the engine i could play with the deck height more. NOw that i have a datum point (how it is at the moment and hows its been for the previous few thousand miles). As Gaz says .. top, middle or bottom? (actually im pretty happy with my all round power) Although these are old tuning books, and jap racer bias, you got to remember, so is the design of the vespa engine! haha! It seems we have all still read them, for one reason or another! BUt it is nice to have a good understanding of how it all works! you can also measure youre squish with plasticine, modelling clay.. i tried the solder down the plug hole method but it was v tricky to get an accurate reading..it keep slipping spinning round when i got the piston towards TDC.. Instead I would take off the head (completly or partially) and slip in some twisted solder wire. even make a cruciform shape with solder wire and tape it on , or stick it with a blob of grease. other things you could do for future reference while you're at it.....as well as the squish... measure your cylinder head volumes. volume of combustion bowl and volume of squish band. and also measure the height of the 'squish, on the head', i never know what to call that?!, Its typically the 0.5mm - 2mm upstand of the squish area, on the cylinder head) Use oil and a syringe to measure volumes if you dont own a burrette (no, neither do i). this will help you figure out your compression. if you want to be accurate when you measure your combustion chamber you could also take off the head, piston at TDCmark TDC on cases/flywheel/somewhere, smear a little grease around the ring to seal the piston and cylinder, put on head and torque down, position cylinder vertically (spark plug hole at the top), check again the piston is still at TDC... fill /measure with oil from your syringe through spark plug hole until oil touches the bottom threads of the spark plug hole (as if the spark plug was in place)... now you can play with compression values and have all the info you need if you raise your barrel or if want to change the head, you can still achieve/or alter your original/desired compression values, and squish values. Be careful.. i can see other questions/topics coming up sooner or later....... in the search for finding optimum power, how important is the compression in the head when piston is at TDC? ill let you read some more first!! |
|
|
|
Post by sime66 on Nov 1, 2014 12:13:22 GMT
Thanks very much chaps, for all the work and information on this thread; I don’t have much to add just now. I’ve re-read it all a couple of times from the start, and I’ve got a feel for where we started - what the actual question was, what I’ve learned, and a nasty realisation that it obviously ain’t much compared to what there is to learn, but how much of it I personally need to learn isn’t yet clear to me. I’ve got an understanding of the principles that I didn’t have before, and an understanding of just how complicated it can get if I let it; but I’m not necessarily getting dragged into it all at this time. To think it’s simple is to fail to understand it.
I’m going to have a really good read, probably ask some more questions, which may or may not be the right ones, and which possibly won’t have theoretical answers. I’ll obviously be following as much as I can if you three take it further, or if this thread is steered to just a quick practical brush-over maybe I’ll start another thread when I’m ready, after some proper reading – hopefully of the relevant bits.
I’ve slept on it, and I’m really not prepared to start experimenting with my scooter until I’ve got a better understanding of it all, and of what will be required; at the moment I see me having it partly disassembled and slowly discovering how much of a complicated job I’ve taken on. – That ain’t going to happen, especially when the direction of this thread is uncertain. It wasn’t the potential free power gain in my scooter that interested me; it was the learning of the subject.
I’ve just been for a good long ride in the morning sun, and asked myself:
Q: Do I wan’t to spend gawd knows how much more time and aggro to make it even maybe slightly better than it is now, or is it pretty damn good as it is?
A: It’s pretty damn good as it is – for now. (Because I have spent a lot of time, money and effort on it this year).
I’m sure each of you would have done a better job of it, and I'm aware I can probably improve it, but I’ve been fixing it all year; hardly ridden it at all, and I’m leaving the scooter alone for now, getting through the Winter with it as it is, and looking forward to a better year of it next year.
It’s the books for me for now, for the Winter – as I originally intended.
|
|
|
|
Post by pxguru on Nov 1, 2014 12:27:02 GMT
This simplification pretty much sums it up. These durations are a bit high for road scooters but they do serve to demonstrate there is only 6 degrees between a 6000 rpm plodder and a 9000 rpm screamer. In milimeters this 6 degrees is about 1mm. A DR kit bolted straight on out the box will be nowhere near 120 degrees. If you are happy with it now just imagine how it could go, maybe something for the Spring The "ported to 8700rpm" on my Polossi means that it revs to 8700rpm in gear. Never seen it rev past 8200rpm in top (Need to lay off the pies for quite a while before that happens) but very happy with it as my road scooter. |
|
|
|
Post by sime66 on Nov 1, 2014 15:45:23 GMT
Pxguru: Yes, definitely something for the Spring – by which time I’ll hopefully have a better idea of what I’m doing and why. But, I have developed your point about mm for degrees duration for my scooter; (57mm stroke, 105mm con-rod). I make it about 1.1mm between 9,000 and 6,000, but it depends which table you use for approximating Port Duration for rpm; the one I posted 30th October is different to Bell; there’s other factors, and there might be a more accurate source somewhere for our old Vespas; for me there’s time to investigate that, and other points that no doubt will crop, up before I dismantle my scooter……..  If it isn’t pushing the theory too far, my table above shows approx 0.19mm per degree of Port Duration at around this rotation of crank, which, going right back to your 1mm gasket, would seem to be slightly under a 5.5° increase (from wherever it is now, which needs to be measured), which could be converted/approximated to rpm, in theory, if all factors were known. Vespasco: You mentioned compression four times in your last post; I have no idea how much, or what effect, 1mm would make in the head; guess what – I’ve got time to find out………. |
|
|
|
Post by pxguru on Nov 1, 2014 16:15:13 GMT
Sime66, You got me going for a sec there. I didnt think I got it wrong. Your little calculator is upside down. Duration is either side of BDC not TDC. Try it again and it will work out to about 1.1mm Don't worry too much about compression or squish clearance until the rest is set up. |
|
|
|
Post by sime66 on Nov 1, 2014 16:25:49 GMT
Oh bugger!!
BDC it is then (I've shown that on my earlier diagram, but slipped up with the table)
BACK TO THE DRAWING BOARD (Screw up the paper not the barrel if you take my point)
Had noted previously that you said compression (and squish) weren't priorities, and your assurances about not suggesting risky things, I was making a point about doing stuff without knowing.
I've corrected the error between TDC & BDC, and have now got the result you said.
I've amended the table above, which I think and hope is now correct. It emphasises your previous point about small amounts in mm making a big difference too.
|
|
|
|
Post by henri on Nov 1, 2014 18:52:13 GMT
vespaco's filling up to plug threads with oil from a syringe is a useful guide to what size head youve got ,but can mislead because of trapped air bubbles an no account of plug nose taking up some volume , i was taught to get a sheet of clear perspex with 4 holes matching stud layout an a hole in centre ,bolt it to ya head n screw in a plug then fill with oil from syringe/dropper pipette keeping tabs on volume of oil put in ,as sheet is clear any air bubbles can be seen an eliminated , a very accurate reading of head volume can then be obtained .
as for ya casio calc , the texas 1's beat em hands down back in the day, an just as i was taught eng drawing cad came around but was so slow with having to set datums n scales/veiw points ,all programmed in bbc basic ,aargghhh , tho that was a time before proper tinterweb ,where outside the military n internal computer company systems like ibm's ,there was only 19 addresses on the nationwide web,all universitys , an i use to have to book hours of transmission time in early morn (1am-5am) to send the machine code/binary translations of other codes that where farmed out to poor skint students like me , i never understood them but was anal-retentive enuff to have a 0% error rating. same with tuning sime ,so long as ya careful n thoughtful you can get success following others methods where there proven good.without having a full in-depth knowledge of what effect your work is having , thats just needed if ya going to branch out n invent a few new wrinkles for others to follow . H
|
|
|
|
Post by vespasco on Nov 1, 2014 20:20:37 GMT
The perspex way is ideal yes! But my workshop facilities were/are not  To measure the head you leave the plug in. Measure the plug too!! The syringe and oil i used was accurate compared to the burette that was used in a 2 stroke tuning shop where i took it (while i was doing some other work there) Handy!!! I got a cheap rebore and they welded my stock/expansion pipe design together too. (Ala sip road) Very nice job! They also checked the piston displacement and combustion chamber volume at TDC and all figures matched mine which were done using my primitive equipment!! even my TDC mark was accurate (believe it or not, at the time, I could accurately find that by feel alone)!!! Not anymore tho'! They had, in their workshop, at the time, a px 125 and were fitting a (malossi?) kit on it. This was their first vespa (they raced jap 2 strokes) and their first vespa kit! I got the impression the Bell book of tuning was their bible. Luckily it was at this time i had been doing lots of research and had just finished reading Bell so picked up on everything they said , which seemed to be straight out the book, almost word for word. I had to really put my point across that the stock p200 cylinder i gave them to rebore needed 0.208mm clearance on barrel.. (Or whatever it is) They werent having any of it!!! and they insisted this vespa they had in their workshop needed a 10mm base gasket!!!? And thats what they done! Set it up , rode it. The 'biker' who test rode it said he never smiled so much when he took it for a spin (his first time, bless). Went really well..... 2 months later it had blown up much to the bemusemnet of the owner. Anyway, the point is, carry on learning but dont get 'too' carried away with Bell & Jennings! (Do they make whiskey)? I didnt realise i mentioned compression 4 times! Sorry. I just think at some point along the line if/when you put all this to practice you will set your cylinder height to optimum, then to finish off the top end you will try to find the perfect head to compliment all your hard work. Theres plenty of other stuff thats just as/more important! Keep riding it if youre happy with it. At least youll have plenty of time to think of how youd like to improve performance. Gaz. What weve been talking about is mostly about simes dr kit. It seems to get the most out of the kit , without any machining/porting work, you would expect to get to 6000rpm. To achieve this you need a transfer duration of 120°... If you want it to rev higher, and produce its power in the higher rev ranges (say 7000rpm) and go faster , 'one' of the things you would need to do is have a transfer duration of 122°. If your transfer duration increases you will need to feed more fuel to the fire and get rid of the exhaust gases (quicker as the revs increase) The hill climbs and wheelies also have lots to do with gearing, aswell as having the power in your bottom |
|
|
|
Post by sime66 on Nov 2, 2014 8:27:28 GMT
It seems to me to potentially be quite a big increase in power, which must have implications.
I’ll give you an example of things that come to mind, (not just technical), which are not yet discussed, maybe not significant, but as yet unanswered (Not questions, just thoughts/examples):
· More fuel – is carb OK? How much more fuel – effect on my mpg?
· More exhaust gasses? – is exhaust OK?
· More Power – is clutch OK (the weak link on my scooter I reckon), is primary OK, is gearing OK, are brakes OK?
· More rpm – what effect on reliability, what effect on wear?
· More rpm – more heat: carb, jetting, plug
I could spend longer on my list to make my point, which doesn’t need an answer; it’s just a point that there are loads of things as yet not thought through, which you may well be able to dismiss, but which I haven’t yet satisfied myself as being covered. Then there’s the technical side:
· Higher revs - better top end; is that what I want? The only real time I am disappointed with my scooter is when it’s trying to drag me and it up a steep hill; that’s not top end, that’s low down grunt I need. If and when I take the barrel of, is the work I do best aimed at improving top end then?
· Increase transfer duration – what now about inlet and exhaust duration?
· It might not be a ‘problem’, but what are the consequences of these things. For example; change in compression, in more specific terms than, it isn’t the most important thing. (I used it as an example of things not considered, vespasco, I wasn’t complaining; that particular post was very helpful, and I dissected it and read it thoroughly many times; it reinforced my feeling that I hadn't thought it through enough).
· ‘Others success’ – what were those others’ targets? I don’t know, each of us has different goals; personally I rarely do loads of WOT riding, other than to test what it will do – most of my riding now is hilly, windy, often muddy lanes, or over one or other of the moors.
· ‘Proven good’ – so little in our little scooter engineering world is proven good; it is unbelievably vague at every step of every job, with differing opinions, trial and error; what of it is proven? – Better to get the best information you can and understand it as best you can, than to follow without question – in my opinion, but lets not argue. (That isn’t meant to sound disparaging; I’m making a general point – that understanding it enables me to ask questions and make my own judgments).
There’s also the familarisation of the measuring jobs I need to do, so that I can do them quickly and accurately, and with the right kit – before I start, not when I’ve taken it apart; so I can do it in one go, and put the scooter back together, having all the information I need until I take it apart again to do the job itself. You can take a break and leave it half-done in your sheds; if I even need a p*sh, I have to make my scooter and tools secure first. Getting my head round those jobs, with a little research and preparation beforehand seems sensible to me.
Finally, we identified two jobs:
1. ‘Blue printing’ (if strictly speaking you can, without having any DR data), which is probably setting it up to 120° (6000 rpm-ish). Now might be the time to say, going by my GPS speeds, and previous work done on gear ratios, I'm already past 6000rpm aren't I?
2. Increasing Transfer Port Duration further, to gain some potentially free and available power by raising the barrel to increase the Transfer Port Timing more. We do now seem to have an idea between mm/timing°/duration°/rpm now; you experienced lot may have known all that already, but developing ‘how’ in, technical and mathematical terms, for me was extremely useful. (I personally would like to take that approach a little further too, but that does seem to be just me who thinks so).
Those two are different things, and aren’t the answer to my original question; they’re one and two stages on from my question. The original question was what did pxguru ji’s little hints mean; and that has been answered very thoroughly. Now I’m asking myself when do I want to go on from there, and my answer to that is when I better understand the implications (practical and technical) of making those adjustments.
If you like, I’ll do those when I have a better understanding of what comes after.
Now; it’s 8:00am and I’m off out on two-pedalled-wheels to blow all this lot out of my brain and think about something else………..
|
|
|
|
Post by pxguru on Nov 2, 2014 12:49:15 GMT
It is possible to make improvements on a set up like yours to whatever you want to do with it. It takes barrel work though and you're not allowed to use power tools anymore Just tweeking the transfer duration to suit your needs isn't going to mean you need a BGM clutch like Vespasco It would be drawing more air so will need to be up jetted. The rest of the engine won't break if you dont wheelie it (too often). The 120 degrees at 6000rpm in that chart refers to where maximum power is, not how high it revs. Yours could typically be max power at 4500rpm or so. Also less open transfers, means less fuel in and that means less power out and peaking too early. |
|
|
|
Post by sime66 on Nov 3, 2014 8:38:43 GMT
Thanks pxguru, those couple of lines, and a good read-up in Bell last night to begin to explain it really helped clarify it, but I wanted to get it clearer before replying. Still not sure I’m ready to reply, but don’t want to ignore your post any longer. I understand what you mean now; that we were not talking about increasing rpm, we were talking about increasing the rpm at which peak power is achieved. I know his emphasis is on Exhaust Port Duration, but Bell explains how Transfer Port Duration needs to increase. (Though I still need to read it a few more times to make sense of that bit and to make it stick in my head – just looking for it again now – pages 42-43). Other bits of information, previously posted here, are falling into place as I read it more thoroughly too. I do have two questions, which if answerable, will help me get all this down on paper for myself in a way that will help me understand it better. They might answer themselves as I understand stuff better, but asking might help it along too: Q1: Is there an accurate table or formula, which gives me Peak Power rpm against Transfer Port Timing that is accurate for my scooter or my kit, or some other way of accurately establishing exactly what Peak Power rpm I currently have when I do my port map? I made a stab at it on Saturday without actually knowing that, but without it I can’t accurately put revs or speed in. I do appreciate that I then also have to make an adjustment to that when I go on to measuring my Static Deck Height, but there must be a reference point. ie is it accurate to say 6000rpm is equivalent to 120° and 9000 is 126°, or is that an approximation? Or, as you refer to me possibly having peak power as low as 4500rpm, what Transfer Duration are you equating that to? (When I measure my Static Deck Height, it will give me mm, from which I will be using my Transfer Port distance to convert to Transfer Duration, and then rpm, but from what source of reference for accurately converting Transfer Duration to rpm?) I know Bell explains the relationship between the two, why higher revs need longer transfers - but not actual specific numbers; maybe a couple more reads and I’ll answer that for myself. I’m beginning to think that it isn’t actual definite numbers, it’s dependant on other things: crankcase pressure, exhaust are mentioned….. (Wary not to get too theoretical – just want to follow the stuff enough to understand it). Q2: I think the answer to this will be to ask me what I want it to do, but I need to ask what target, or feasible maximum target rpm for peak power are we talking about? What is that rpm in Transfer Duration? I already know rpm against speed from gearing, so is the question at what speed I want my peak power? (Sometime, later, there will be the question of what that peak power actually is, and if I shift it to a higher rpm, what effect does that have on the rpm that I shifted it away from, but that can wait; it’s all the stuff on those dyno graphs isn’t it). Without having yet measured my barrel, I did find last night some figures for a DR177 online, which gave the Exhaust as 180°, and the Transfer as 120°, (with the inlet opened to 170 - from what I don’t know, but that one isn’t important yet anyway). I’d like to play with those numbers until I measure my own, which is why any input on those two answers above would help me. If not, I’ll take 120° to be 6000, and work with that for now, as it seems closest; even this morning it is dawning on me that there aren’t exact numbers for the bit in my following it through that’s missing. I am still going to play with some numbers first, for my own learning/understanding/memory; I won’t bog the thread down if no one else is benefiting from them. I do now see that I need to have a proper, careful measure of barrel and head to proceed ; even just to play with some numbers to help me follow some of the stuff I’m reading, before the practical application. I’m getting my head around that job (I have no idea how I’m going to turn my scooter to orientate the engine to measure the Combustion Chamber Volume though). That’ll do; it’s probably more than enough; every time I read it I tweak it, but I’m probably starting to guess rather than adding to it now. With dremel work to date, I reckon I have probably removed more metal than flesh, but with the drill I’ve recently been less successful – still got the hole in my finger from last time.  (My natural environment is pen and paper, but I'm working on it). |
|
|
|
Post by pxguru on Nov 4, 2014 6:38:49 GMT
Q1, there is no definitive data but all the tables you will find agree within a few degrees, so it must be true. I would only recommend that you measure what you have. Then after some analysis you will decide where you want to be and what you can practically change. The weakest part of any PX engine in generally good condition is the clutch and this is the limiting factor of increasing the power. A banded CosaII is good for 15 bhp without doubt. Q2, The existing rpm for max power can be estimated by the speed/rpm it goes at when faced with a mild hill or into light wind. That being the case adjusting the engine to how slow you want to go is one way of looking at it. The higher the transfers the higher the peak power but the later the power comes in, so again the bottom of the power band is the limiting factor. On a scooter with only 4 gears every single porting technique to widen the power band must be used to achieve maximum usable power Once you measure where you are, calculate what you need to improve against what you can achieve with your facilities and skill available you will probably decide to just fit the 1mm base packer and be done with it |
|
|
|
Post by sime66 on Nov 5, 2014 6:57:41 GMT
Thanks very much for you patience with this, pxguru; I reckon I’m finally ready to do some dirty work! I’ve played with some numbers to get a feel, and worked more on my little calculator (to help me get it all worked out in my head, and all on one sheet), which for now is using the best data I’ve found or worked out, but which will be replaced with my own as soon as I measure. It will enable me to adjust transfer duration degrees for peak power rpm, see the mm adjustment, and keep an eye on squish. It will also calculate compression and compression reduction, but that needs a little more maths and a lot more aggro with scooter-work, so I’m considering leaving that bit alone for now as I’m assured the reduction in compression isn’t significant. (And I have other engine work to do, so that volume-measuring malarkey might best wait till then). I was trying to pin max power rpm to duration down as accurately as I could because my speed is my best estimation of my rpm for calculations, and ultimately the factor on the road that matters; I’ll use the rpm-duration figures I’ve been using then – I’ve checked my tyre circumference and gear ratios, so have an idea of transfer duration against max power at given speed in each gear; (just roughly). Just out of interest, I read your reply to fpb earlier, and it reminded me that I stuck with a 21tooth clutch when I replaced my mk1 with a Cosa, so there’s a tweak there too when I’ve got a spare £50. (Mine’s not banded; I got lots of differing advice, and decided against banded – I ended up getting Sip 93401000 because it’s 16 rivet, compressed/hardened, and I’ve put 16 springs in it and I used the stronger circlip). As the logic of it, and your advice, fit together I do see that this is about moving the max power to higher revs, not increasing max power – this is obtained by moving the ports (reversible); whereas increasing the band would require increasing the ports (not reversible, and with, in my case not only danger to barrel, but also to the finger count and bandage rations). Sensibly though, I’ll have another chat about the clutch and selecting the peak power rpm at the actual time of deciding the change(s), just to be sure I’m not going to lose my low-down grunt (‘bottom of power band/coming in later’), which to me, in my mind, is the hill-puller that I personally need, so need to be aware of that; I’m regularly climbing 12 - 14% hills, and I’m no lightweight either. I’ll see where it is now first, as you say. I need to think about approximating the increased jetting needed too. I’ll post my little calculator as it is now, and some other tables I’m using. For the figures shown on them in red, I need to do the measuring now to input my own, but those used here are: Transfer 120°, exhaust 180°, volume 177.68cc, compression ratio 1:8.5 (giving combustion chamber volume approx 23.6cc, I think), squish and static deck height shown as 0, but accounted for in the formulae, and will be input when I measure them. From the measured transfer position in mm, and the measured squish and static deck height, the duration in degrees is output, and can be used against the revs (and speed) tables. Then a transfer duration increase can be decided on and input and is converted to mm, and increase in squish (and static deck height) will also be output for checking. I might play with the compression ratio calc., or leave it, not sure; difficult to check without real numbers. It doesn’t matter if I only end up using a 1mm spacer, (which I could have done in the first place without learning it); it was more about the learning, which I think got a bit tedious for others, but I feel was worthwhile for me. Whatever I do, ;I’ll now understand whyJ I think that’s it really, until I do some measuring; thanks again for the advice. (Some stuff below; just for the hell of it – all needing a check or tweak when I put my own measurements in, but useful to make, and hopefully use soon). Work in progress; I’ll check them when I put my measurements in too: (vespasco, this is what I was talking about first thing this morning; we can try it with your numbers if you like?)    |
|
|
|
Post by vespasco on Nov 5, 2014 13:02:43 GMT
None of this has been tedious for me..... In fact in has led me to a much better understanding of the perfect set up and ive almost reached tuning Nirvana!!! Then i realised that i also need to check my (stock 200) gearing to see just how fast it can physically go with or without a kit...if i can get enough power to my gears to reach the speeds shown in the calculator then i think ive done a good job! Ive finally understood that those rpm/transfer duration figures given in the good books are actually a very good guideline, that we can (and do) all use!!! Thats the bit that always threw me... (Where they came from, (years of other peoples experience), what can they be used for (setting port timings accurately),who says so? (We all do)?! As i have my engine in pieces on my living room floor i took the time to measure more accurately... Heres some figures that relate to where my set up has been for past few reliable and fast 1000s of milesmiles...if i didnt thrash everywhere it would still be running strong! I dont need to thrash it anykore, my experiment is over (and i can confirm the clutch was the weakest link) and im happy my motor is fast, quick and powerful without loosing reliability. To think it was built mostly out of almost knackered, second hand parts (inc. cylinder kit, an indian efl gearbox, cases, carb, ignition) then optimised and theh thrashed eveywhere its done really really well!! Now will be even better??!?!?! My actual specs: Bore 69mm Stroke 60mm Conrod 110mm 224.36cc Combustion chamber volume (piston at TDC) 26cc Piston displacement 5.5cc Total volume of cylinder head 31.5cc Ignition timing at 18.7° Base packer 0.2mm Squish gap 1.9mm (i wanted it lower, @ 1.5mm but the machine shop didnt quite mangage it)! Uncorrected compression ratio @ 9.63:1 which is v close to the bullet proof stock P/X200, which is what i based my head compression/design on, after setting cylinder height). - although i didnt actually set up my cylinder to the guide lines here it actually (by chance - due to the reasons stated below)?! ended up where it needs to be... Deck height 0.38mm (with 0.2mm packer) Top of exhaust port to top of cylinder - 37.3mm Exhaust duration = 169.34° - not quite enough it seems for 7500rpm but its quite wide! (42mm arc measured across the arc of the 69mm bore/ 39.5mm measured straight across). (Im not interested in trying to make it go above 7500rpm/75mph)! 70mph is enough on a 40 year old vespa and an even older rider! Transfer port height 47.7mm Transfer duration = 123.91° - this is more suited to around 8000rpm! So, 'without going over' i need to lower my cylinder!! Or lower my transfer timings somehow but as we arent allowed to do any machining i have no choice! (i have a nikasil lined cylinder and i aint touching that anyway)!!! so really, in my instance, im governed by the minimum amount of deck height i can get away with (remember im using a Dykes ring as top of piston crown) before the rings shoot out of the top of the cylinder! I settled on the 0.38mm deck height ive been using, any less would be worrying! Im already under the 0.5mm minimum deck height that people would suggest for a 7500rpm long stroke...(I like to push it and dispel the myths So if i used no packer my transfer timings would be much better (without going over) @ 122.9° which suits the 7500 rev range im aiming for but makes the exhaust worse with a shorter duration of 168.55°, i would need that closer to 171° if i go by the 'golden rule' .. But maybe my exhaust port is wide enough to make up for it!? And remember the transfer and blowdown are much more important than the exhaust duration. (I hvent worked out the port areas etc and probably never will forthis kit as i wont alter it as its nikasil lined) After the transfers are set the blowdown timing is the next thing to check. And for my 7500rpm i would need blowdown of 24° , which basically means i need extend the top of my exhaust port by just 0.2mm!!! Like i said, i aint touching my nikasil lined cylinder so i have to come to a happy medium! that happy medium is getting the deck height within usable limits, which i have very little to play with if i want to effectively lower the cylinder! (i wouldnt be happy using a head gasket to overcome this) and the other end of the cylinder is the exhaust port, which needs ,ideally, to cover the rings at BDC Knowing that my set up (used to)! max out at 7300rpm/73mph (according to my SIP speedo and when it was running ok) i can use that as a guide line. This also tallys up with the gearing calculator (although actual on the road speeds are 2 or 3mph less,i guess due to the wind resistance etc - if i had my chin on the speedo im sure i could reach/get closer to the theoretical speeds shown on the gear calculator! All my speeds are riding as upright as i can possible at those speeds. I have to squat a little just to hang on!!! My particular pinasco kit, with 60mm long stroke crank, without any base packer, would only give a deck height of 0.18mm!!! Remember in my case that i have Dykes ring, which effectively is the top of the piston/where to measure from... Having only 0.18mm of deck height on 60mm 225cc stroker is not very much at all, in fact id go as far as to say its not enough!!! If however it was a 'normal' piston with 2 x rings lower down the piston then it would be ok for the top of the piston to travel past thetop of the cylinder, so long as the rings dont go past the top of cylinder then its ok (squish accordingly)! So without a base gasket my transfer timings come down to 122.9° which is right where i want to aim for,which is around the 7500rpm. Plus if i was even able to lower my cylinder then the upper Dykes ring would not be covered at BDC, id have around 1\2 the thickness of the ring constantly exposed to hot exhzust gases when at BDC... So here i am, stuck in the middle...with cylinder low enough so that the transfer timings are within the ranges without going over and with the cylinder high enough so that is covers the rings at BDC! Your chzrts put mine to shame sime!!! Heres what i ended up with....but i think i should do it again with gearing too... 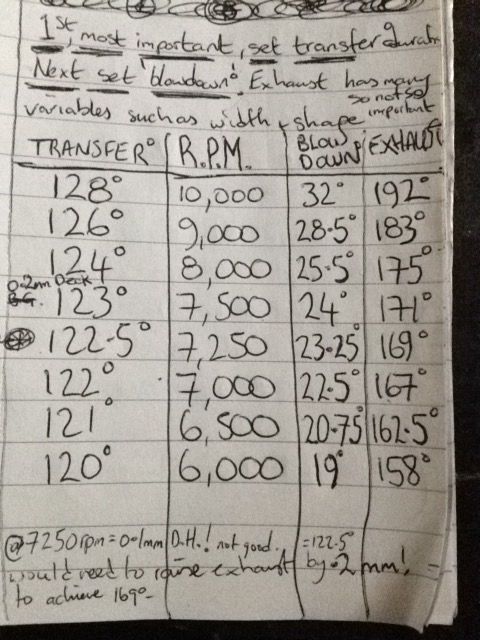 And while i have all these facts and figures...here are a few more for my engine..... Si24/24e 130 main, 52/140, BE3, 160 Sip road Stock gears I was using an unbanded piaggio stock cosa clutch with uprated springs and plates but have since found this is the weakest link in my motor and went o.t.t. and bought the crown jewels, i mean a bgm superstrong clutch!! (Stock 23 tooth) For the SIP speedo readings ive been quoting- 1320mm tyre circumference (Continental Navigators 3.50 x 10) (1325mm circumference seems to be the average/recommended size to use) Setting no.3 for rpm Speedo drive ratio = 0.75 (black with 9 teeth) Top speed 73mph @ 7300rpm (in 4th gear = 3000rpm = 30mph, 4000rpm = 40mph etc etc) Until my clutch seal failure the motor would max out at 7300rpm in every gear. (at this max rev range I often wondered if the ignition was restricted but dont think so) After my clutch seal failure it would rev to 7300rpm in 2nd and 3rd but only to 6400rpm in 4th, (hence my earlier thread on loss of power),which was reason enough for me to rebuild it again!! And to dig out my tuning notes, which like Henri,i didnt plan on looking at again really!! The previous (inaccurate) figures i gave for my port timings were all measured, unconvincingly, with a degree wheel that kept moving. The figures ive used above were taken with verniers in 0.00mm, measuring the port heights on the cylinder and using maths from there. I just want to double check i got this right.... The ideal transfer durations given should not be exceeded if you want max power? |
|
|
|
Post by sime66 on Nov 5, 2014 15:53:10 GMT
Blimey, we must be getting somewhere because most of that makes sense to me, and the numbers are nearly the same too. - I get a tiny discrepancy with your transfer degrees – I get 124.01°, not 123.91° (is 0.1° important? Probably not - I checked mine against Lambretta calc too, and agree with that). The discrepancy repeats in the adjusted transfer figures, but I do see how tight your margin for tweaking is. I also get a different compression ratio of 8.12:1, which again agrees with Lambretta calc, but that’s an area I’m still learning and putting numbers to, so I’d ignore me on that; just mentioning it. You really need Henri and pxguru to give their input to your set-up/tweaks, so I’m going to but-out for a bit and try to keep track of what they say. I did put your figures into my calculator, more so that I can test it for myself because you’ve done it all already really, except for the gear ratios. I’ll post them anyway, but you can pretty much ignore them. I’ve also reposted your mph/gear ratio table now that we’ve added in best-guess transfer duration. It does all sort of fall into place now really, with some real numbers; I can’t tweak my stuff anymore – need the morning, first coffee, no distractions brain to concentrate on it. I’m now taking a back seat to observe and try to keep up………………….. Going to re-read yours a few times too; you've introduced blow-down, 'golden rule' and a few bits I need to read up on, anyway I get less accurate in the afternoon/evening, so best leaving it alone now. Hope the chaps sort you out! V. interesting.. BEFORE AND AFTER (0.2MM SPACER): YOUR GEARS AND TYRES WITH TRANSFER PORT DURATION AND REVS YOUR GEARS AND TYRES WITH TRANSFER PORT DURATION AND REVS |
|
|
|
Post by pxguru on Nov 5, 2014 16:43:35 GMT
wow, you have all been busy. Vespasco, 123 sounds like plenty. 24 degrees is about minimum blowdown and is all you need for yours. Don't worry too much about the dykes ring, as long as there is a little static deck above it.
Swept volume compression numbers on a 2 stroke don't mean a great deal. See what you can do with your head to keep the trapped compression over 6.5:1 (pretty much the same as a standard P200).
|
|
|
|
Post by vespasco on Nov 5, 2014 19:35:18 GMT
*EDITed pictures and words****! you know it makes sense ;D i also make the transfers 24.01* im not sure where i got 23.91 from? as for compression ratios.... i can see what youve (easily) done... youve not taken into account the volume of the piston dome/displacement, which in my case is 5.5cc, (31.5cc - 5.5cc = 26cc). This is the actual whole combustion chamber volume at TDC. Try putting 26cc into the calculator **Yet another edit** I meant to add - When using the calculator - its the [static] deck height that changes with different base gasket thicknesses. The top of port to top of cylinder will always remain the same (unless you physically remove material from the top of the ports) which leads me on to aiming for a 6.5:1 corrected compression ratio.....i must be missing something there. Pinascos porting isn't that much different from stock is it!? My corrected ratio is 4.27:1 to get that i would need a 15cc combustion chamber!!!??! giving almost 16:1 uncorrected! i dont need to even fit that head to know thats waaaayy too much! Maybe with a combination of porting work this maybe possible but in my case, porting aint possible!! i like 'a little less' compression, it gives less stress to the motor and hopefully will last a little longer! heres what i actually have (or had) most figures are from my notes when i first built the engine a while back, although i did re check the port heights the other day! Uncorrected ratios are, rightly or wrongly, commonly used so i find those easier to relate to I'd also go so far as to say these timings below do actually work!, even although the figures ain't perfect (with si24, sip road) but maybe there is another horse lerking somewhere!!? 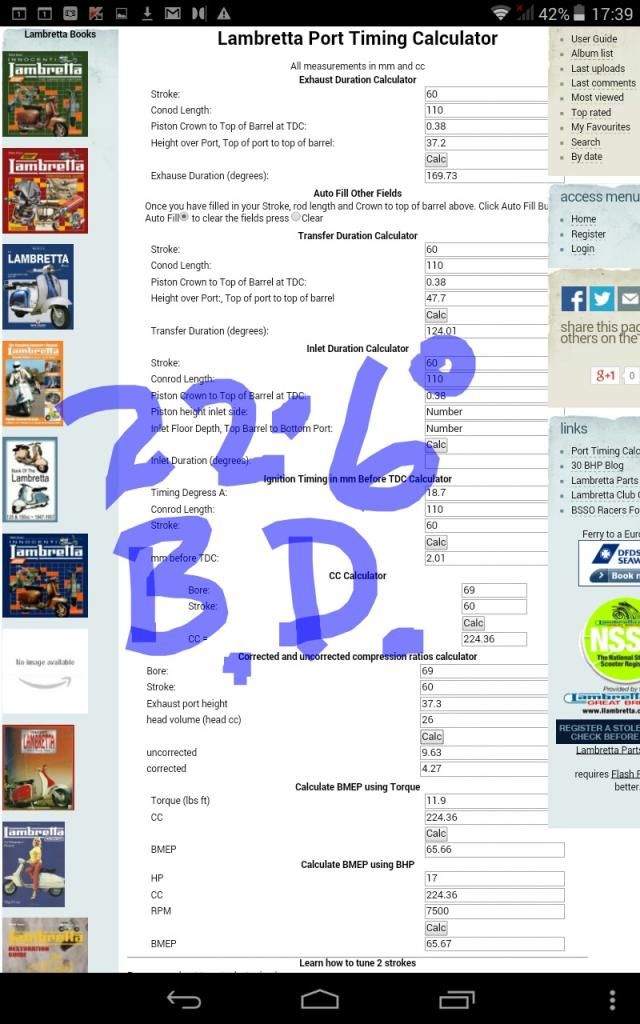
*(ignore the figures at the bottom,, im not sure how acurate they are) I aim to achieve a transfer duration of 23.5*, which is as low as i dare go *(but as yet im not convinced this small deck height is ok) with the top of that dykes ring literally 0.28mm below the top of the cylinder, which is also not exactly a sharp,square edge! theres definately a small radius there too which gives me even less tolerance. i really dont want to see that ring start to expand over the top of the cylinder wall at every stroke. You'll have to use your calcs to see the figures for 0.28mm deck, i cant edit them in!? Basically, 123.51* transfer, 169.34* exhaust, 22.9 blow down, 0.28mm static deck height Running without a base gasket (i would just use gasket cement) i would get a better transfer duration, and a better blowdown duration which is more desirable but I'm seriously worried that at high revs, long running, with everything warm/hot, expansion of metals etc that 0.18mm static deck height (measured to top of Dykes ring)!! is really not enough. I dont know the expansion rate of my conrod and piston etc but i really dont want that ring going past the radius on the top of cylinder... i know you say a little guruji but 0.18mm is extremely small to me, for a 225cc long stroker anyway..id prefer something like 0.5mm to be well safe... i thought i was on the ragged edge @ 0.38mm as it is. with that radius finish its effectively a negative deck!? i can only do as mentioned above really, (if the tiny static deck height @ 0.28mm is still acceptable)....come to a happy medium. pic below is with no base gasket and just 0.18mm static deck height... but the figures are as good as i can get with long stroke and no machining... 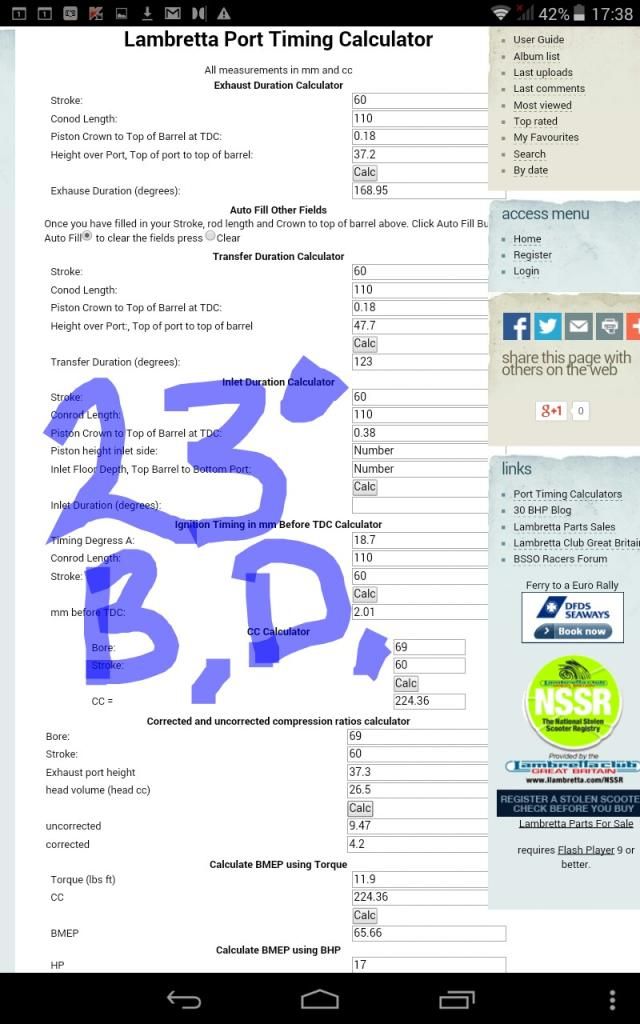 i will be turning all this info into reality soon and can only hope that when i re measure the actual (static) deck height again it will be more than when i measured before ;D , giving much more tolerance to play with. (When i stripped the engine a friend came round, I got distracted and carried on stripping it and forgot to re-measure deck height, although i used same thickness base gasket so should, in theory at least, be the same as before. In practical terms, I really only have 0.1mm to play with before my ring pops out of the top of the cylinder. I cannot achieve 24* B.D. (blowdown) or less than 123* T.D. without machining the bottom off the barrel or altering the ports. i can sort the head out no problem. it will be intersting to note how it performs compared to how it was, by actually decreasing the transfer duration by just 0.5* ! First ive got to rebuild it without ruining the clutch seal! - more on that in my other thread when i get to it. *Edit - i got in a muddle with the pics but im sure you can work it out on your calc. The gearing calculator is pretty much the same to 'actual on the road' in 2nd and 3rd, where i can achieve those closer (only just). But ive never hit 78.9mph in 4th. I put my chin near the speedo once and started to creep over 75mph , if i also done that going downhill id probably get a little closer still ...but who's counting??! (+ its cheating)! Top speed is not important. Getting the max from what you have is where it's at |
|
|
|
Post by pxguru on Nov 6, 2014 6:03:28 GMT
I would fit a 0.1 base gasket and leave it at that. The only reason you are reducing the transfer duration is to lower the power band. If I cant do that then I just raise the revs and increase the power a bit to balance it out. That way it can rev higher in 3rd to close the gear gap. Without porting the barrel you can just raise the compression or fit a long length expansion with a lower rpm power band. You are in a muddle with the trapped compression. Typical confusion from the Lammy camp with their engines that run backwards The exhaust port height is the height of the exhaust port (23.8mm in your case) not the height to the deck (37.3mm) Try it again. I work yours out as 6.28:1. So there is some head skimming to do (The squish needs closing up anyway) Question for H. Would this ally barrel grow in height more than the conrod would lengthen? |
|
|
|
Post by sime66 on Nov 6, 2014 8:11:56 GMT
I’m still following, but keeping out of it; the edits of edits last night lost me a bit, and pxguru posted this morning while I was half way through doing my calc updates, so I’m just keeping up each time I catch up – again! Please vespasco, when you settle on a plan, if you have time, screen-print a finished Lambretta Calc table, or at least your final checked figures; I’d really like to finish this thread at the same point as you, rather than getting lost at the end now we’ve gone over to sorting the specifics of tweaking your barrel. I need the figures, so that I can keep up in my own time; you both go too quickly for me. If you’re changing the 0.2mm base gasket to a 0.1mm and leaving it at that, I’m getting the same transfer as you (so, rpm & speed OK) , but I’m not getting the exhaust or blowdown you said last night. (169.34 was the original figure; what do you get for 0.1mm? (168.95 & 22.72?). When I come to do mine, it’s going to be a great help to me if I’ve been able to follow yours through to the end; it won’t take you a minute to post it, and it’ll be really useful for me to spend some time on with all before, and now your final after figures too. Cheers. 
|
|
|
|
Post by vespasco on Nov 6, 2014 13:53:18 GMT
Ah yeh! I knew something was wrong!! Bloody lammys!!
I think if anything, the conrod would expand more than the barrel as the barrel is torqued down and the conrod isnt. Ali barrel will more likely expand (buckle/warp) in other directions?!? And cool quicker.
Would appreciate your input too H! My memory of metallurgy aint what it used to be!
Im sticking with the sip road, as i want it looking stock, which is not a bad pipe in combination with the si24 and torquey pinasco.
I know there is more compression to be had from the head, it was made slightly larger than what i asked for but hey ho) but i can sort that,including the squish gap!
So moving the revs down...im not entirely sure i need to!
I was aiming for the ideal 7500rpm/123° trans duration because i thought i could!!
im tempted to stick with the .2mm packer?!
Actually , until i get the crank fitted (this weekend!?)im not sure... Will need to measure my new deck height first, thejn dedide, as it seems to be the deck height which has very little tolerance to play with due to Dykes ring. Bloody dykes!
I will certainly post my final specs when they arrive!! My maths was probably out last night. It was a bit hectic last night. Posts were not posting so i had to write it all again. Edits were not editing as cursor was jumping all over the place. I couldnt see the pics i was posting and got in a right muckin fuddle. Hopefully its all ok now?
* Extra! Extra! Read all about it!
Another edit is made!!
Exhaust port height i measure @:
(at the moment)
61.5mm - 37.3mm = 24.2mm = 6.15:1 corrected = 26cc C.C. (combustion chamber)
To achieve:
6.5:1 = 24.5cc C.C. required.
(10.16:1 uncorrected)
Which means i would need to take off 0.56mm off the head, which would also bring my squish gap to where i originally wanted it too!
As mentioned earlier, im ok with a lower rather than higher compression...but will look forward to finding out if/where this gives me any extra power! And hopefully this will help me realise the difference between un/corrected ratios in practical terms too!
Luckily, being a bit like Wurzel Gummidge, i have 2 heads to play with! (The other being similar but with slightly less compression and slightly larger squish - again due to not quite reprofiling the head as id asked for) ill use that one so i can revery back to original set up at anytime, which proved to be quite successful.
First i need to wait for my clutch bearing and seal to arrive (tomorrow)...install....(weekend) .then measure my deck height, then sort the head compression/squish.
This is all about squeezing that last horse/s out of the kit / getting it running most efficiently!! Its close as it is but can i improve upon it?!?!?!?
|
|
|
|
Post by pxguru on Nov 7, 2014 3:28:11 GMT
Exhaust port height i measure @: (at the moment) 61.5mm - 37.3mm = 24.2mm = 6.15:1 corrected = 26cc C.C. (combustion chamber) That 61.5 should be 60.38. Still works out very similar though. A little skimming to do, especially if you stay with the 124 TD. While on the compression subject 6.5:1 for corrected compression is still not so much. 6.5:1 is the same value for a standard PX200 as it came out of the factory. So not going to strain the engine very much On an air cooled scooter tuned just for speed there could be 8:1 corrected compression and the same engine can still take it long term with a decent crank. Next point is the squish clearance; the less clearance there is, the less mixture compressed in the squish and less likely to detonate at the outer edge. So go as close as you dare to avoid mechanical contact. The books all say 1.2mm is safe for a 200. What they don't tell you about is the detonation risk. There is actually far more damage done from detonation with a wider squish clearance as there is more fuel at the edge to go bang! The ideal for racing is 0 mm, when expanded at full temperature (and someone else is paying the bills). On my own road scooters I usually set to less than 1mm, never had an issue. With all the issues there are to fix it might be ok with the 124 TD. If it pulls 4th then 124 would actually be faster in the end. With the passing seal, casing leaks and low compression sorted it should just about make it Edit: Without an expansion type exhaust giving some "supercharge effect" the 6.5:1 corrected compression can be even higher! |
|


